
Free Shipping on Domestic Orders $75+

Asus X515EA-BB53-CB LCD Screen Replacement

What you need

  1. Asus X515EA-BB53-CB LCD Screen Replacement, LCD Screen: step 1, image 1 of 1
    • Completely power off the laptop by holding down the power button for 5 seconds.

    • Ensure that this step has been properly completed before moving on to step 3; repairing while the device is still powered on could result in an electrical shock to yourself or damage to the laptop.

  2. Asus X515EA-BB53-CB LCD Screen Replacement: step 2, image 1 of 3 Asus X515EA-BB53-CB LCD Screen Replacement: step 2, image 2 of 3 Asus X515EA-BB53-CB LCD Screen Replacement: step 2, image 3 of 3
    • Use precision tweezers to remove the screw covers located at the base of the screen.

    • Remove the black 3mm screws at the base of the screen using the Phillips #1 screwdriver.

  3. Asus X515EA-BB53-CB LCD Screen Replacement: step 3, image 1 of 3 Asus X515EA-BB53-CB LCD Screen Replacement: step 3, image 2 of 3 Asus X515EA-BB53-CB LCD Screen Replacement: step 3, image 3 of 3
    • Lower and close the lid.

    • Flip the laptop over so that the bottom of the case is facing up to reveal the screws underneath.

  4. Asus X515EA-BB53-CB LCD Screen Replacement: step 4, image 1 of 3 Asus X515EA-BB53-CB LCD Screen Replacement: step 4, image 2 of 3 Asus X515EA-BB53-CB LCD Screen Replacement: step 4, image 3 of 3
  5. Asus X515EA-BB53-CB LCD Screen Replacement: step 5, image 1 of 3 Asus X515EA-BB53-CB LCD Screen Replacement: step 5, image 2 of 3 Asus X515EA-BB53-CB LCD Screen Replacement: step 5, image 3 of 3
    Tool used on this step:
    Prying and Opening Tool Assortment
    $9.95
    Buy
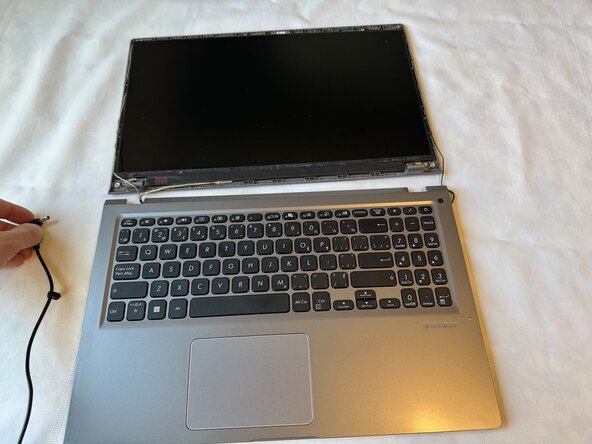
    • Insert a plastic pry tool into the space between the base and the inside of the laptop to gently open and remove the cover on the base of the laptop

    • If this is the first time the base of your laptop has been opened, this will require a fair amount of force. Start from the hinges to make this process easier.

  6. Asus X515EA-BB53-CB LCD Screen Replacement: step 6, image 1 of 3 Asus X515EA-BB53-CB LCD Screen Replacement: step 6, image 2 of 3 Asus X515EA-BB53-CB LCD Screen Replacement: step 6, image 3 of 3
    • Push down on the metal clip securing the battery cable.

    • Pull up on the battery cable to disconnect it.

    • Ensure this step is completed before moving on; residual power in the battery can be dangerous during disassembly.

  7. Asus X515EA-BB53-CB LCD Screen Replacement: step 7, image 1 of 3 Asus X515EA-BB53-CB LCD Screen Replacement: step 7, image 2 of 3 Asus X515EA-BB53-CB LCD Screen Replacement: step 7, image 3 of 3
    • Use tweezers to gently peel back the adhesive tape securing the LCD cable to the motherboard.

    • Pull the LCD cable away from its port to disconnect it.

  8. Asus X515EA-BB53-CB LCD Screen Replacement: step 8, image 1 of 2 Asus X515EA-BB53-CB LCD Screen Replacement: step 8, image 2 of 2
    • Unroute the Wi-Fi cable from around the cooling fan.

    • Lift up on the Wi-Fi cable to disconnect it from its port.

    • The Wi-Fi cable may be difficult to connect during reassembly; ensure the wire is properly routed with enough slack to move the end towards its port.

  9. Asus X515EA-BB53-CB LCD Screen Replacement: step 9, image 1 of 3 Asus X515EA-BB53-CB LCD Screen Replacement: step 9, image 2 of 3 Asus X515EA-BB53-CB LCD Screen Replacement: step 9, image 3 of 3
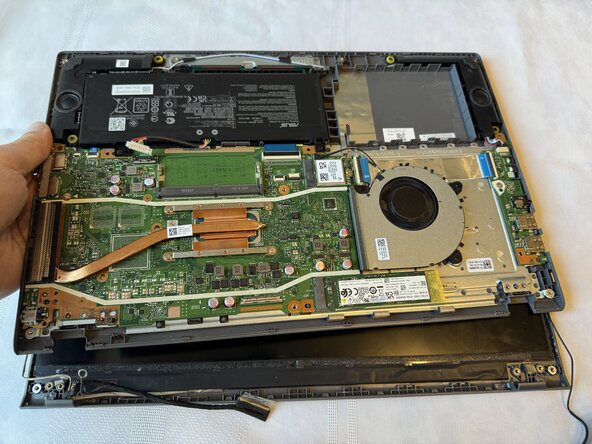
    • Remove six silver 5mm screws from the hinges using a Phillips #1 screwdriver.

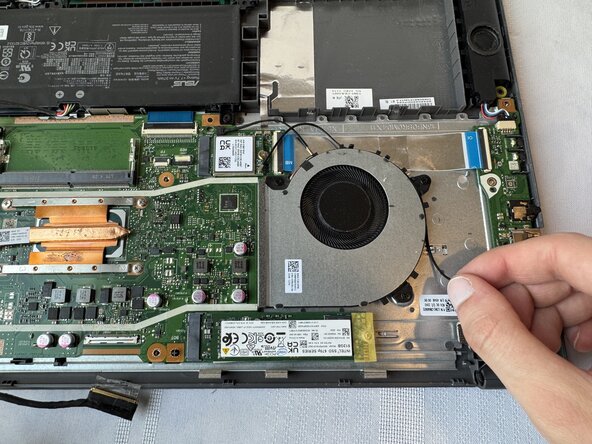
    • One screw has a metal ring surrounding it. This ring is connected to the LCD cable.

    • Pull both hinges away from the motherboard until they are at a 90° angle in relation to the laptop base.

    • Make note of which screw this ring was attached to; be sure to put the ring on the screw before reassembly.

  10. Asus X515EA-BB53-CB LCD Screen Replacement: step 10, image 1 of 3 Asus X515EA-BB53-CB LCD Screen Replacement: step 10, image 2 of 3 Asus X515EA-BB53-CB LCD Screen Replacement: step 10, image 3 of 3
    • Lift and remove the main laptop base away from the screen assembly, and set the base aside.

  11. Asus X515EA-BB53-CB LCD Screen Replacement: step 11, image 1 of 3 Asus X515EA-BB53-CB LCD Screen Replacement: step 11, image 2 of 3 Asus X515EA-BB53-CB LCD Screen Replacement: step 11, image 3 of 3
    Tool used on this step:
    Prying and Opening Tool Assortment
    $9.95
    Buy
    • Use the plastic pry tool to unclip the surrounding bezel.

    • When reinstalling the bezel, be sure to route wires around the frame of the screen assembly as they were originally to prevent jamming.

    • The bezel is extremely fragile and prone to breaking; be sure to apply even pressure during removal to prevent breakage.

  12. Asus X515EA-BB53-CB LCD Screen Replacement: step 12, image 1 of 3 Asus X515EA-BB53-CB LCD Screen Replacement: step 12, image 2 of 3 Asus X515EA-BB53-CB LCD Screen Replacement: step 12, image 3 of 3
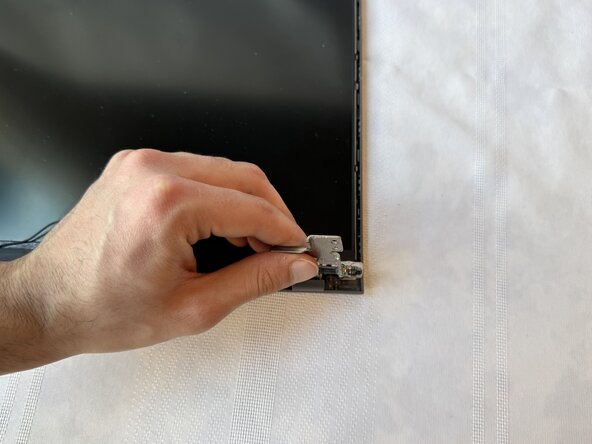
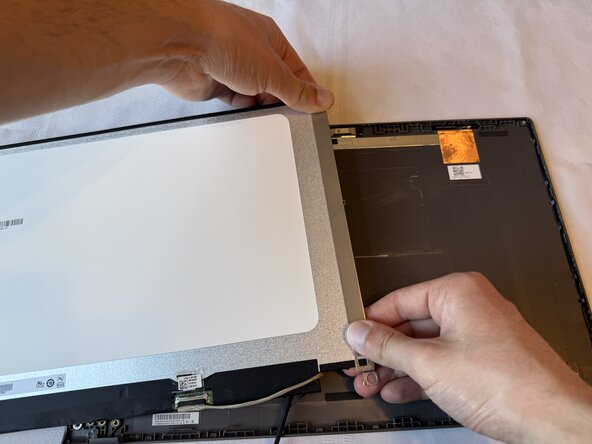
    • Remove two black 2mm screws from the top of the screen assembly using a Phillips #1 screwdriver., these connect the LCD to the back plate.

    • Remove six silver 2mm screws from the bottom of the screen assembly; these connect the hinges to the screen assembly.

    • Two of the silver 2mm screws will be covered by silver tape; use tweezers to lift this tape before unscrewing them.

    • Before screwing the screws back in during reassembly, check to ensure that no wires are being jammed or crushed.

  13. Asus X515EA-BB53-CB LCD Screen Replacement: step 13, image 1 of 3 Asus X515EA-BB53-CB LCD Screen Replacement: step 13, image 2 of 3 Asus X515EA-BB53-CB LCD Screen Replacement: step 13, image 3 of 3
    • Lift and remove the hinges that were previously unscrewed.

    • Carefully lift the LCD screen out of the back plate.

    • Flip and lay LCD screen face-down to reveal the LCD cable and its port, the 30-pin connector on the back of the laptop

  14. Asus X515EA-BB53-CB LCD Screen Replacement: step 14, image 1 of 3 Asus X515EA-BB53-CB LCD Screen Replacement: step 14, image 2 of 3 Asus X515EA-BB53-CB LCD Screen Replacement: step 14, image 3 of 3
    • Lift the tape securing the LCD cable to the bracket using tweezers.

    • Disconnect the LCD cable by pulling it away from the panel.

  15. Asus X515EA-BB53-CB LCD Screen Replacement: step 15, image 1 of 3 Asus X515EA-BB53-CB LCD Screen Replacement: step 15, image 2 of 3 Asus X515EA-BB53-CB LCD Screen Replacement: step 15, image 3 of 3
    Tool used on this step:
    Prying and Opening Tool Assortment
    $9.95
    Buy
    • Pry off and remove the LCD brackets located on the back of the LCD using the plastic pry tool.

    • This will require a fair bit of force; the brackets are prone to bending so be sure to apply even pressure during removal.

    • Note the orientation of the brackets when removing them; they will need to be placed the exact same way on the new screen.

  16. Asus X515EA-BB53-CB LCD Screen Replacement: step 16, image 1 of 3 Asus X515EA-BB53-CB LCD Screen Replacement: step 16, image 2 of 3 Asus X515EA-BB53-CB LCD Screen Replacement: step 16, image 3 of 3
    • In order to test the new display, gently connect the tan LCD cable into the new LCD panel's port.

    • Pull the tape taut and press it down to ensure connection.

    • Flip the LCD screen and place it in the screen assembly, so that the display is visible.

  17. Asus X515EA-BB53-CB LCD Screen Replacement: step 17, image 1 of 3 Asus X515EA-BB53-CB LCD Screen Replacement: step 17, image 2 of 3 Asus X515EA-BB53-CB LCD Screen Replacement: step 17, image 3 of 3
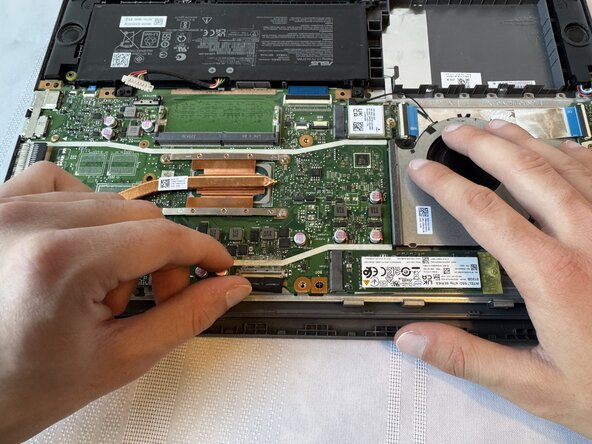
    • Place the base of the laptop back on top of the screen assembly, ensuring that the hinges align and the internals are facing upwards.

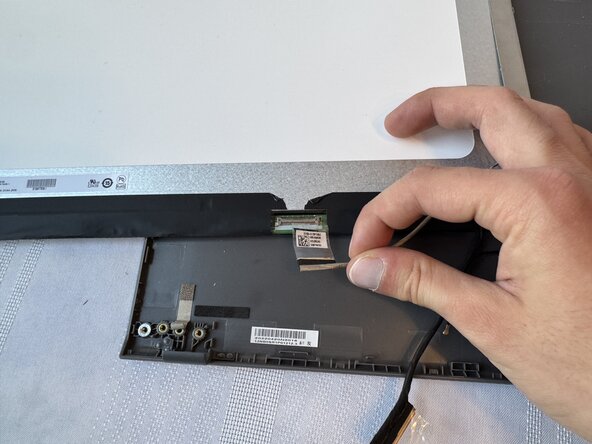
    • Plug the black LCD cable into the motherboard by pressing it gently into its port.

    • Pull the tape on the connector taut and press it down on the motherboard to ensure connection.

  18. Asus X515EA-BB53-CB LCD Screen Replacement: step 18, image 1 of 3 Asus X515EA-BB53-CB LCD Screen Replacement: step 18, image 2 of 3 Asus X515EA-BB53-CB LCD Screen Replacement: step 18, image 3 of 3
    • Carefully flip the laptop so the keyboard and screen are visible and the internals are facing downwards.

  19. Asus X515EA-BB53-CB LCD Screen Replacement: step 19, image 1 of 3 Asus X515EA-BB53-CB LCD Screen Replacement: step 19, image 2 of 3 Asus X515EA-BB53-CB LCD Screen Replacement: step 19, image 3 of 3
    • In order to turn on the display, plug the laptop's power adaptor into the charging port.

    • Press the power button located at the top-right hand side of the keyboard; the display should power on if previous steps were completed correctly.

  20. Asus X515EA-BB53-CB LCD Screen Replacement: step 20, image 1 of 3 Asus X515EA-BB53-CB LCD Screen Replacement: step 20, image 2 of 3 Asus X515EA-BB53-CB LCD Screen Replacement: step 20, image 3 of 3
    • Once the new LCD has been tested, power off the laptop by holding the power button down for 5 seconds.

    • Unplug the power adaptor from the laptop's charging port.

    • Ensure that this step has been completed before moving on; working on the laptop while it is powered on could result in damage to electronics or yourself.

  21. Asus X515EA-BB53-CB LCD Screen Replacement: step 21, image 1 of 3 Asus X515EA-BB53-CB LCD Screen Replacement: step 21, image 2 of 3 Asus X515EA-BB53-CB LCD Screen Replacement: step 21, image 3 of 3
    • In order to prepare the LCD for reassembly, flip the base of the laptop back on top of the screen assembly, ensuring that the internals are facing upwards.

    • Locate the black LCD cable that was reconnected to the motherboard; it will be removed so that the brackets can be installed on the new LCD.

  22. Asus X515EA-BB53-CB LCD Screen Replacement: step 22, image 1 of 3 Asus X515EA-BB53-CB LCD Screen Replacement: step 22, image 2 of 3 Asus X515EA-BB53-CB LCD Screen Replacement: step 22, image 3 of 3
    • Use tweezers to lift the tape connecting the black LCD cable to the motherboard.

    • Gently pull the black LCD cable away from the motherboard’s video port in order to disconnect it.

  23. Asus X515EA-BB53-CB LCD Screen Replacement: step 23, image 1 of 3 Asus X515EA-BB53-CB LCD Screen Replacement: step 23, image 2 of 3 Asus X515EA-BB53-CB LCD Screen Replacement: step 23, image 3 of 3
    • To reisolate the screen assembly, remove the base of the laptop from the top of the screen assembly and put it aside.

  24. Asus X515EA-BB53-CB LCD Screen Replacement: step 24, image 1 of 3 Asus X515EA-BB53-CB LCD Screen Replacement: step 24, image 2 of 3 Asus X515EA-BB53-CB LCD Screen Replacement: step 24, image 3 of 3
    • Gently flip the LCD screen to reveal its back, ensuring that the tan LCD cable is not unplugged.

    • Retrieve the brackets that were taken off of the old LCD screen, press those on to the back of the new one.

    • Be sure to be accurate with the application of the brackets. The lip of the bracket should be snug and level with the corner of the LCD screen to ensure a correct fit.

    • Apply a significant amount of pressure to the brackets when attached to ensure adhesion.

Conclusion

To reassemble your device, follow these instructions in reverse order.

Carlo Baldassini

Member since: 01/21/26

349 Reputation

1 Guide authored

0 Guide Comments

Add Comment

View Statistics:

Past 24 Hours: 1

Past 7 Days: 21

Past 30 Days: 51

All Time: 218