Introduction
If your hard drive has failed or needs to be replaced, this guide will show you how to get to the hard drive and remove it.
What you need
-
-
-
Turn off the laptop and flip it face down.
-
Using a Phillips #0 screwdriver, remove the seven 9mm screws circled in red.
-
With the same screwdriver, remove the four 5mm screws circled in orange.
 Ask FixBot
-
-
-
Flip the laptop face up and open the lid.
-
Use the plastic opening tool to pry around the entire edge of the keyboard panel to loosen the panel from the base.
-
-
-
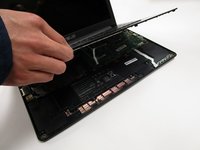
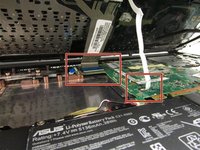
Partially lift the panel up, revealing the two cables connected to the motherboard.
-
-
-
-
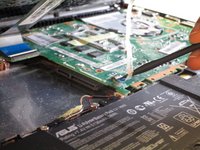
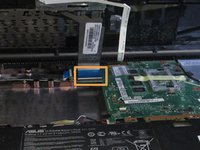
Disconnect the first ZIF cable by lifting the tab using the spuger tool or your fingernail and gently pull the cable out.
-
Disconnect the second ZIF cable by lifting the tab using your fingernail and gently pull the cable out. This one is more difficult to reach with the spudger.
-
-
-
Remove the keyboard panel completely and set it aside. The internal components of the laptop are now exposed.
-
-
-
-
-
Remove the four 5mm screws from the hard drive mounting bracket using the Phillips #0 screwdriver.
-
-
-
Slide the hard drive in the direction away from the connector and lift it up to remove it.
-






To reassemble your device, follow these instructions in reverse order.
Cancel: I did not complete this guide.
3 other people completed this guide.

Team

UC Davis, Team 1-5, Rodger Winter 2017 Member of UC Davis, Team 1-5, Rodger Winter 2017
UCD-RODGER-W17S1G5
4 Members
72 Guides authored
