
Free Shipping on Domestic Orders $75+

Asus VivoBook S14 Screen Replacement

What you need

  1. Asus VivoBook S14 Screen Replacement, Back Panel: step 1, image 1 of 2 Asus VivoBook S14 Screen Replacement, Back Panel: step 1, image 2 of 2
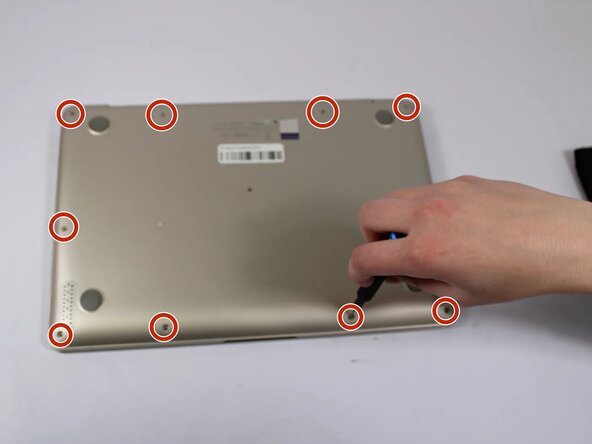
    • Remove all eleven 5 mm screws on the back panel with a Phillips #0 screwdriver.

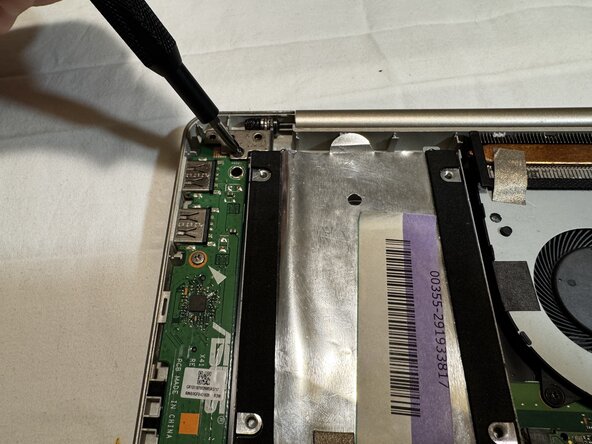
    • Insert an iFixit opening tool between the back panel and the chassis. Carefully pry around the edges until the plastic clips release.

    • Do not force the cover. If you feel significant resistance, double-check for missed screws.

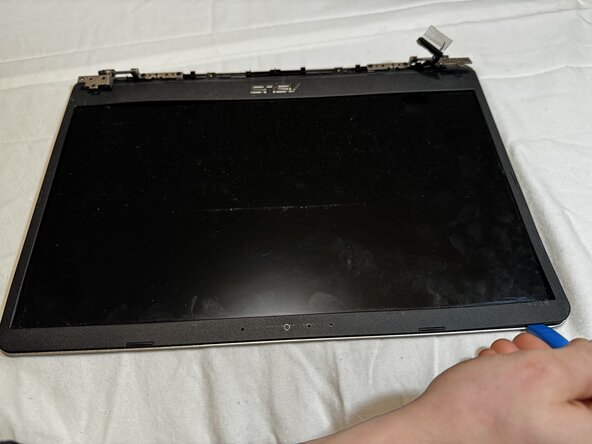
    • Lift the back panel off the laptop.

  2. Asus VivoBook S14 Screen Replacement, Screen: step 2, image 1 of 1
    • Disconnect the battery connector.

    • If the battery is inflated or needs to be disposed, please follow this guide.

  3. Asus VivoBook S14 Screen Replacement: step 3, image 1 of 2 Asus VivoBook S14 Screen Replacement: step 3, image 2 of 2
    • Using a Phillips screwdriver to remove the screws securing each of the two hinges.

  4. Asus VivoBook S14 Screen Replacement: step 4, image 1 of 2 Asus VivoBook S14 Screen Replacement: step 4, image 2 of 2
    • To disconnect the display cable from the motherboard, flip up the small metal locking bail using your opening tool or fingernail.

    • Then gently slide the connector horizontally out of its socket by pulling the clear plastic tab.

  5. Asus VivoBook S14 Screen Replacement: step 5, image 1 of 1
    • Separate the upper case (keyboard/palm rest assembly) from the lower chassis frame.

  6. Asus VivoBook S14 Screen Replacement: step 6, image 1 of 2 Asus VivoBook S14 Screen Replacement: step 6, image 2 of 2
    • With the iFixit opening tool, place the tool's flat edge into the seam where the cover meets the laptop chassis.

    • Gently twist the tool or use a side-to-side wiggling motion to release the internal plastic clips.

    • Once a gap is created, apply a gentle upward or outward force to "pop" the hinge cover off, working your way along the length of the hinge from one side to the other.

  7. Asus VivoBook S14 Screen Replacement: step 7, image 1 of 1
    • Use a Phillips screwdriver to remove the two screws securing the bezel to display assembly.

  8. Asus VivoBook S14 Screen Replacement: step 8, image 1 of 3 Asus VivoBook S14 Screen Replacement: step 8, image 2 of 3 Asus VivoBook S14 Screen Replacement: step 8, image 3 of 3
    • To separate the bezel, insert the opening tool into the seam between the screen and the frame.

    • Slide the opening tool along the perimeter while applying a gentle twisting motion to pop the internal plastic clips.

    • Caution: If the bottom edge feels stuck, don't yank it. Check for internal plastic clips.

  9. Asus VivoBook S14 Screen Replacement: step 9, image 1 of 3 Asus VivoBook S14 Screen Replacement: step 9, image 2 of 3 Asus VivoBook S14 Screen Replacement: step 9, image 3 of 3
    • Disconnect the webcam connector.

  10. Asus VivoBook S14 Screen Replacement: step 10, image 1 of 2 Asus VivoBook S14 Screen Replacement: step 10, image 2 of 2
    • Using a Phillips screwdriver to remove the mounting screws securing the metal hinges to the display chassis.

    • Firmly grasp the sides of the display and slide the panel upward or outward to clear the hinge pins from their alignment slots.

    • Caution: Make sure the video cable is fully detached and moved out of the way before sliding the panel to ensure it doesn't snag or tear.

Conclusion

To reassemble your device, follow the above steps in reverse order.
Take your e-waste to an R2 or e-Stewards certified recycler.
Repair didn’t go as planned? Try some basic troubleshooting or ask our Answers community for help.

Alexis Harper

Member since: 02/04/26

481 Reputation

4 Guides authored

Team

UW Tacoma, Team E-3, Rose Winter 2026 Member of UW Tacoma, Team E-3, Rose Winter 2026

UWT-ROSE-W26SEG3

4 Members

4 Guides authored

0 Guide Comments

Add Comment

View Statistics:

Past 24 Hours: 1

Past 7 Days: 22

Past 30 Days: 30

All Time: 88