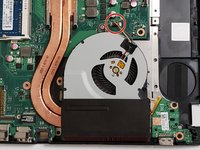
Free Shipping on Domestic Orders $75+

Asus ROG G56JK Fan Replacement

What you need

  1. Asus ROG G56JK Fan Replacement, Battery: step 1, image 1 of 2 Asus ROG G56JK Fan Replacement, Battery: step 1, image 2 of 2
    • Push the slider to the opposite side, while pulling out the battery.

    • Remove the battery from the device.

  2. Asus ROG G56JK Fan Replacement, Hard Drive: step 2, image 1 of 1
    • Remove the 4 mm screw on the cover using a Phillips #0 screwdriver.

    • Remove the cover for the hard drive by pushing down and sliding it towards yourself.

  3. Asus ROG G56JK Fan Replacement: step 3, image 1 of 1
    • Slide the hard drive to left and remove it from the device.

  4. Asus ROG G56JK Fan Replacement, Back Panel: step 4, image 1 of 1
    • Unscrew the four 4mm screws using a Phillips #0 screwdriver.

  5. Asus ROG G56JK Fan Replacement: step 5, image 1 of 1
    • Flip the computer right side up and start to lift the keyboard. The keyboard/back panel should come off.

    • Do not force the keyboard/back panel off. This could damage internal components and bend the keyboard.

  6. Asus ROG G56JK Fan Replacement, Fan: step 6, image 1 of 2 Asus ROG G56JK Fan Replacement, Fan: step 6, image 2 of 2
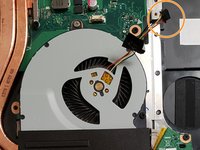
    • Unplug the red and yellow wires from the port in the motherboard.

    • Lightly pull on the red and yellow wires to release.

  7. Asus ROG G56JK Fan Replacement: step 7, image 1 of 1
    • Remove the 5mm screw.

    • Remove the 4mm screw.

  8. Asus ROG G56JK Fan Replacement: step 8, image 1 of 1
    • The fan is glued to the black box that it is inside of. When pulling the fan out, you may experience a small amount of tearing of the black box.

    • Gently pull the fan out of the black box.

Conclusion

To reassemble your device, follow these instructions in reverse order.

0 Guide Comments

Add Comment

View Statistics:

Past 24 Hours: 1

Past 7 Days: 1

Past 30 Days: 18

All Time: 2,104