Free Shipping on Domestic Orders $75+

Asus ROG G20CB CPU Replacement

What you need

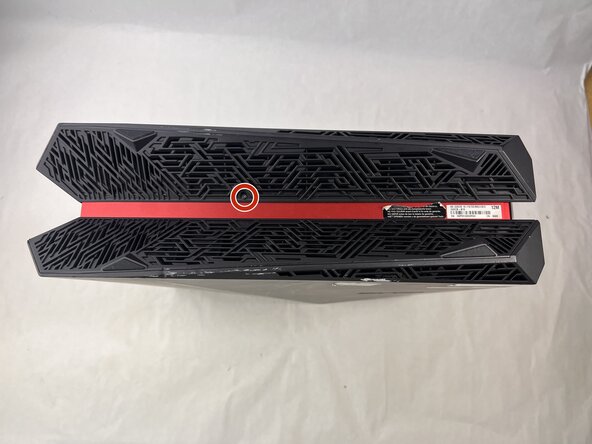
  1. Asus ROG G20CB CPU Replacement, Fan: step 1, image 1 of 2 Asus ROG G20CB CPU Replacement, Fan: step 1, image 2 of 2
    • Remove each of the two 4.6 mm Phillips screws on the top and bottom of the tower.

    Ask FixBot

    Add Comment

  2. Asus ROG G20CB CPU Replacement: step 2, image 1 of 1
    • Slide the front panel to the left and lift gently.

    • There is a cable connecting the panel to the computer. Handle it gently and avoid straining the connected panel.

    Ask FixBot

    Add Comment

  3. Asus ROG G20CB CPU Replacement: step 3, image 1 of 1
    • Disconnect the cable carefully by pulling gently on both sides of the connector.

    Ask FixBot

    Add Comment

  4. Asus ROG G20CB CPU Replacement: step 4, image 1 of 1
    • Remove the five 4.6 mm Phillips screws holding down the fan tray and then pull the fan tray out of the system.

    • The fans are connected by a thin cable, be gentle when removing tray.

    Ask FixBot

    Add Comment

  5. Asus ROG G20CB CPU Replacement: step 5, image 1 of 1
    • Carefully unplug the two fan cables from the motherboard by pulling straight up from the base of the connector.

    Ask FixBot

    Add Comment

  6. Asus ROG G20CB CPU Replacement: step 6, image 1 of 1
    • Remove the six 4.6 mm Phillips screws connecting the fans to the fan tray.

    Ask FixBot

    Add Comment

  7. Asus ROG G20CB CPU Replacement, CPU Cooler: step 7, image 1 of 1
    • Remove the 4.6 mm Phillips screw that secures the optical drive.

    Ask FixBot

    Add Comment

  8. Asus ROG G20CB CPU Replacement: step 8, image 1 of 1
    • Push the optical drive out of the chassis.

    Ask FixBot

    Add Comment

  9. Asus ROG G20CB CPU Replacement: step 9, image 1 of 1
    • Pull back the tape on the heat sink and use a long-neck Phillips screwdriver to remove the four screws securing the heat sink.

    • There is a number next to each screw, when taking the cooler off, loosen in descending order (4-3-2-1). When installing a cooler, tighten in ascending order.

    Ask FixBot

    Add Comment

  10. Asus ROG G20CB CPU Replacement: step 10, image 1 of 1
    • Remove the 4.6 mm Phillips screw from the heatsink at the top of the case.

    • Lift the CPU cooler out of the system.

    • Be sure to apply fresh thermal paste before reinstalling a cooler.

    Ask FixBot

    Add Comment

  11. Asus ROG G20CB CPU Replacement, CPU: step 11, image 1 of 1
    • Locate the CPU socket retention arm next to the processor.

    • Push the arm down and out, then lift it upward to release the CPU cover.

    Ask FixBot

    Add Comment

  12. Asus ROG G20CB CPU Replacement: step 12, image 1 of 1
    • Gently lift the CPU straight out of the socket.

    • Handle the CPU by its edges. Do not touch the bottom pins or contacts to avoid damage.

    Ask FixBot

    Add Comment

  13. Asus ROG G20CB CPU Replacement: step 13, image 1 of 1
    • Reassembly tip: When installing a new CPU make sure to align the gold triangle with the white circle on the motherboard.

    Ask FixBot

    Add Comment

Conclusion

To reassemble your device, follow the above steps in reverse order.
Take your e-waste to an R2 or e-Stewards certified recycler.
Repair didn’t go as planned? Try some basic troubleshooting or ask our Answers community for help.

Cancel: I did not complete this guide.

One other person completed this guide.

Kimber-Starr

Member since: 03/21/25

361 Reputation

3 Guides authored

Team

0 Guide Comments

Add Comment

View Statistics:

Past 24 Hours: 1

Past 7 Days: 10

Past 30 Days: 39

All Time: 506