
Asus Q500A Hard Drive Replacement

cameron and 4 other contributors
Last updated on May 13, 2021
Views: 1.4K
View statistics:
- Past 24 Hours:
- 3
- Past 7 Days:
- 22
- Past 30 Days:
- 104
- All Time:
- 1,386
Comments: 0
No one has left comments on this guide. Will you be first?
Go to guide commentsCompleted: 2 3
2 people have marked this guide "completed." Will you be next?
3 people have marked this guide "completed." Including you — great job!
Favorites: 0 1
No one has favorited (and subscribed to) this guide. Will you be the first?
1 person has favorited (and subscribed to) this guide — and that's you!
Action Shots
Be an action hero! This guide needs images that better demonstrate how to perform specific actions.
Needs More Images
A few more images would make this guide's procedures crystal clear.
Introduction
Go to step 1 ↓This guide will demonstrate how to replace the hard drive on the Asus Q500A.
What you need
Fix Kit
This kit contains all the parts and tools needed to complete this guide.

Parts

Tools

-
-
-
Use a J0 screwdriver bit to remove both screws on the back-plate, found at the bottom of device.
-
Remove back-plate.
-
Note: Use prying tool if your having issues lifting back-plate.
-
-
-
-
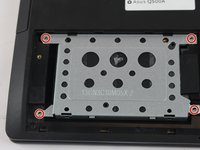
Remove 4 screws from the metal hard-drive case. There will be one in each corner.
-
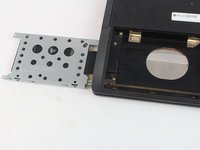
Remove the hard-drive case from the device.
-
-
-
Remove the hard-drive. It will be connected to the integrated sata-port in the device.
-
-
-
Place hard-drive into slot and connect to the integrated sata port.
-
Place hard drive case back on top of the new hard-drive.
-
Screw in the four screws on the hard-drive case.
-
-
-
Place back-plate back on device.
-
Screw in the 2 screws on the back of the plate.
-

 Ask FixBot




To reassemble your device, follow these instructions in reverse order.
Cancel: I did not complete this guide.
2 other people completed this guide.

Team

USF Tampa, Team 12-5, Eyestone Spring 2017 Member of USF Tampa, Team 12-5, Eyestone Spring 2017
USFT-EYESTONE-S17S12G5
3 Members
36 Guides authored
