
Asus G53JW-A1 Keyboard Replacement

Tim Cedar and 4 other contributors
Last updated on May 7, 2024
Views: 804
View statistics:
- Past 24 Hours:
- 1
- Past 7 Days:
- 23
- Past 30 Days:
- 72
- All Time:
- 804
Comments: 0
No one has left comments on this guide. Will you be first?
Go to guide commentsCompleted: 0 1
No one has marked this guide "completed." Will you be the first?
1 person has marked this guide "completed." It's you — great job!
Favorites: 0 1
No one has favorited (and subscribed to) this guide. Will you be the first?
1 person has favorited (and subscribed to) this guide — and that's you!
Introduction
Go to step 1 ↓This guide is for replacement of a defective keyboard on the Asus G53JW-A1 laptop. Removing this part is essential for further repairs on this device.
What you need
Tools
-
Spudger4.9
-


-
-
-
There are five tabs underneath the keyboard that hold the keyboard in place along the top edge. Refer to the photo for a rough idea of the location of these tabs.
-
Using the spudger and iFixit Opening Tool at the indicated locations, pry the keyboard directly up. Ensure that the tools reach under both the plastic keyboard cover and the metal base of the keyboard, as both will be removed.
-
Remove the keyboard.
 Ask FixBot
-
-
Tool used on this step:Tweezers$4.99
-
Lift the keyboard so that you can see the housing and cables underneath. Be sure you lifted the metal baseplate of the keyboard and not just the plastic covering.
-
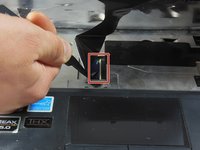
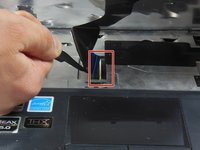
This will reveal a ribbon wire on the right side of the laptop connected to the motherboard through a small window in the metal top plate. Use tweezers to carefully pull the connector gently to the left, unplugging it from its port.
-
-
-
-
Just above the trackpad, there is a second, wider ribbon cable connected to the motherboard. Unplug this cable.
-
-



To reassemble your device, follow these instructions in reverse order. i.e. plugging in the ribbon cables, then snapping the clips into position using the bottom hinge as a guide.

Team

Oregon Institute of Technology, Team S1-G4, Lancaster Fall 2018 Member of Oregon Institute of Technology, Team S1-G4, Lancaster Fall 2018
OIT-LANCASTER-F18S1G4
3 Members
108 Guides authored
