Free Shipping on Domestic Orders $75+

Asus Eee PC 1201N Hard Drive Replacement

What you need

  1. Asus Eee PC 1201N Hard Drive Replacement, Battery: step 1, image 1 of 1
    • Flip the netbook over.

    • Be sure to unplug the netbook and power off the device while working.

    Ask FixBot

    Add Comment

  2. Asus Eee PC 1201N Hard Drive Replacement: step 2, image 1 of 1
    • Push open both tabs on either side of the battery.

    • The tab on the left will click open and stay in place until you close it.

    Ask FixBot

    Add Comment

  3. Asus Eee PC 1201N Hard Drive Replacement: step 3, image 1 of 1
    • Pull the tab on the right open, while you remove battery with your other hand.

    • Pull the battery straight out ensuring that you don't damage any connectors.

    Ask FixBot

    Add Comment

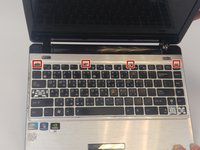
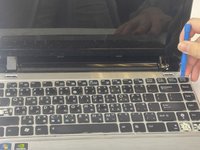
  4. Asus Eee PC 1201N Hard Drive Replacement, Keyboard: step 4, image 1 of 2 Asus Eee PC 1201N Hard Drive Replacement, Keyboard: step 4, image 2 of 2
    • Open the netbook to find the four small grooves along the top of the keyboard.

    • Pry the keyboard up using the plastic opening tool.

    Ask FixBot

    Add Comment

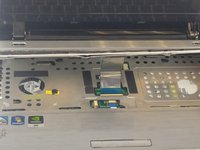
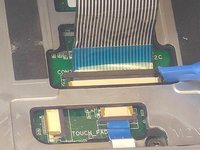
  5. Asus Eee PC 1201N Hard Drive Replacement: step 5, image 1 of 2 Asus Eee PC 1201N Hard Drive Replacement: step 5, image 2 of 2
    • Tilt the keyboard away from you to access the connector. Gently push the lock toward the screen to unlock it and slide the ribbon out.

    • Remove the keyboard.

    Ask FixBot

    Add Comment

  6. Asus Eee PC 1201N Hard Drive Replacement, Hard Drive: step 6, image 1 of 1
    • Turn the netbook over and remove the eight 6.5mm screws using the J0 Phillips head screwdriver.

    Ask FixBot

    Add Comment

  7. Asus Eee PC 1201N Hard Drive Replacement: step 7, image 1 of 2 Asus Eee PC 1201N Hard Drive Replacement: step 7, image 2 of 2
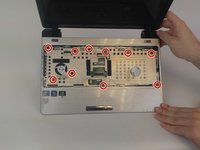
    • Turn the netbook back over and remove the ten 4.5mm screws using the J0 Phillips head screwdriver.

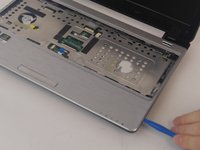
    • Remove the cover plate by sliding the plastic opening tool around the entire edge of the plate.

    Ask FixBot

    Add Comment

  8. Asus Eee PC 1201N Hard Drive Replacement: step 8, image 1 of 1
    • Flip up the retaining flap on the ZIF connector. Then, pull the blue tab for the touchpad connector before removing the cover plate completely.

    Ask FixBot

    Add Comment

  9. Asus Eee PC 1201N Hard Drive Replacement: step 9, image 1 of 1
    • Remove the four 4.6mm screws with the J0 Phillips head screwdriver.

    Ask FixBot

    Add Comment

  10. Asus Eee PC 1201N Hard Drive Replacement: step 10, image 1 of 2 Asus Eee PC 1201N Hard Drive Replacement: step 10, image 2 of 2
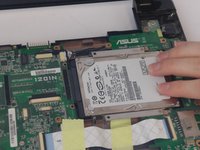
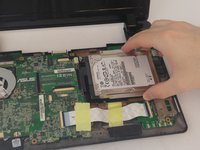
    • Slide the hard drive to the right and then lift it straight out of the netbook.

    Ask FixBot

    Add Comment

Conclusion

To reassemble your device, follow these instructions in reverse order.

Cancel: I did not complete this guide.

4 other people completed this guide.

Trae Mikesell

Member since: 10/04/16

397 Reputation

3 Guides authored

Team

USF Tampa, Team 2-3, Nance Fall 2016 Member of USF Tampa, Team 2-3, Nance Fall 2016

USFT-NANCE-F16S2G3

4 Members

12 Guides authored

0 Guide Comments

Add Comment

View Statistics:

Past 24 Hours: 2

Past 7 Days: 14

Past 30 Days: 37

All Time: 3,922