Free Shipping on Domestic Orders $75+

Asus Chromebook Flip C214MA Display Assembly Replacement

What you need

  1. Asus Chromebook Flip C214MA Display Assembly Replacement, Battery: step 1, image 1 of 1
    • Use a Phillips #0 screwdriver to remove the single 5 mm screw from the smaller back panel.

    Ask FixBot

    Add Comment

  2. Asus Chromebook Flip C214MA Display Assembly Replacement: step 2, image 1 of 3 Asus Chromebook Flip C214MA Display Assembly Replacement: step 2, image 2 of 3 Asus Chromebook Flip C214MA Display Assembly Replacement: step 2, image 3 of 3
    • Use a spudger or opening tool to remove the battery access panel.

    Ask FixBot

    Add Comment

  3. Asus Chromebook Flip C214MA Display Assembly Replacement: step 3, image 1 of 3 Asus Chromebook Flip C214MA Display Assembly Replacement: step 3, image 2 of 3 Asus Chromebook Flip C214MA Display Assembly Replacement: step 3, image 3 of 3
    • Use the spudger to remove the battery connector panel.

    Ask FixBot

    Add Comment

  4. Asus Chromebook Flip C214MA Display Assembly Replacement: step 4, image 1 of 2 Asus Chromebook Flip C214MA Display Assembly Replacement: step 4, image 2 of 2
    • Disconnect the battery cable. Use the tip of a spudger or your fingernail to flip up the small locking flap, then gently pull the cable out of the connector.

    • Do not pull on the wires. Pull from the connector only.

    Ask FixBot

    Add Comment

  5. Asus Chromebook Flip C214MA Display Assembly Replacement: step 5, image 1 of 3 Asus Chromebook Flip C214MA Display Assembly Replacement: step 5, image 2 of 3 Asus Chromebook Flip C214MA Display Assembly Replacement: step 5, image 3 of 3
    • Disconnect the keyboard ribbon, touchpad ribbon, microphone ribbon, and camera ribbon. Use the spudger to lift each locking tab before removing the ribbon cables.

    Ask FixBot

    Add Comment

  6. Asus Chromebook Flip C214MA Display Assembly Replacement: step 6, image 1 of 1
    • Remove the four 5 mm Phillips #0 screws from the inside of the panel.

    Ask FixBot

    Add Comment

  7. Asus Chromebook Flip C214MA Display Assembly Replacement: step 7, image 1 of 3 Asus Chromebook Flip C214MA Display Assembly Replacement: step 7, image 2 of 3 Asus Chromebook Flip C214MA Display Assembly Replacement: step 7, image 3 of 3
    • Flip the device over and open it. Use a spudger to unclip and remove the palm rest from the bottom cover.

    Ask FixBot

    Add Comment

  8. Asus Chromebook Flip C214MA Display Assembly Replacement: step 8, image 1 of 1
    • Remove the two 2 mm Phillips #0 screws from the battery cover.

    Ask FixBot

    Add Comment

  9. Asus Chromebook Flip C214MA Display Assembly Replacement: step 9, image 1 of 2 Asus Chromebook Flip C214MA Display Assembly Replacement: step 9, image 2 of 2
    • Use tweezers to pull the battery cable from beneath the motherboard.

    Ask FixBot

    Add Comment

  10. Asus Chromebook Flip C214MA Display Assembly Replacement: step 10, image 1 of 3 Asus Chromebook Flip C214MA Display Assembly Replacement: step 10, image 2 of 3 Asus Chromebook Flip C214MA Display Assembly Replacement: step 10, image 3 of 3
    • Flip the device back over onto the top cover. Disconnect the USB cables from the motherboard.

    Ask FixBot

    Add Comment

  11. Asus Chromebook Flip C214MA Display Assembly Replacement: step 11, image 1 of 2 Asus Chromebook Flip C214MA Display Assembly Replacement: step 11, image 2 of 2
    • Carefully untuck the USB cables from beneath the motherboard.

    Ask FixBot

    Add Comment

  12. Asus Chromebook Flip C214MA Display Assembly Replacement: step 12, image 1 of 3 Asus Chromebook Flip C214MA Display Assembly Replacement: step 12, image 2 of 3 Asus Chromebook Flip C214MA Display Assembly Replacement: step 12, image 3 of 3
    • Lift the battery out of the device. The battery is now removed. To reassemble the device, follow these steps in reverse order.

    Ask FixBot

    Add Comment

  13. Asus Chromebook Flip C214MA Display Assembly Replacement, Motherboard: step 13, image 1 of 2 Asus Chromebook Flip C214MA Display Assembly Replacement, Motherboard: step 13, image 2 of 2
    • Flip the device over and use the Phillips #0 screwdriver to remove the four 7.5 mm screws

    • Remove the six 6 mm Phillips #0 screws from the bottom cover and bottom cover panel.

    Ask FixBot

    Add Comment

  14. Asus Chromebook Flip C214MA Display Assembly Replacement: step 14, image 1 of 2 Asus Chromebook Flip C214MA Display Assembly Replacement: step 14, image 2 of 2
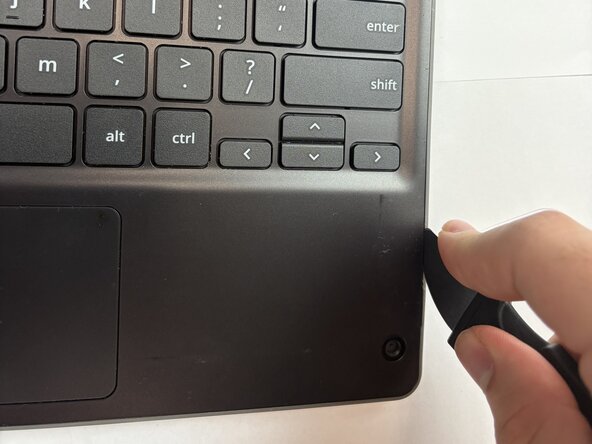
    • Open the back panel using a metal spudger.

    Ask FixBot

    Add Comment

  15. Asus Chromebook Flip C214MA Display Assembly Replacement: step 15, image 1 of 3 Asus Chromebook Flip C214MA Display Assembly Replacement: step 15, image 2 of 3 Asus Chromebook Flip C214MA Display Assembly Replacement: step 15, image 3 of 3
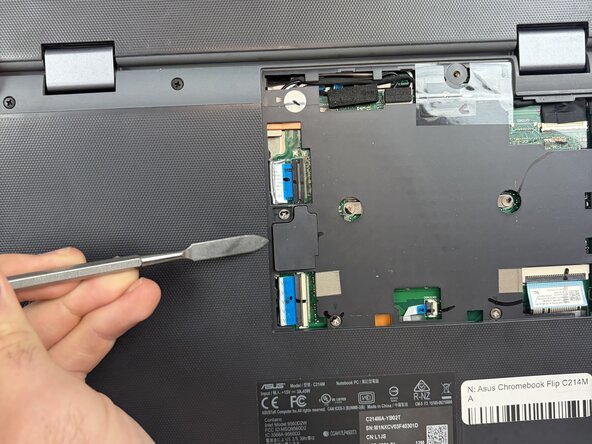
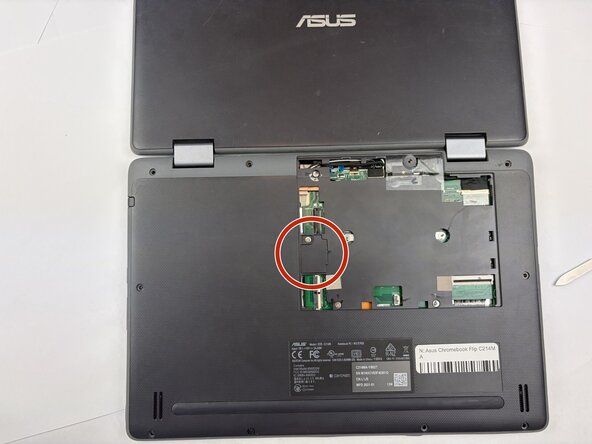
    • Use the metal spudger to remove the battery connector access panel.

    Ask FixBot

    Add Comment

  16. Asus Chromebook Flip C214MA Display Assembly Replacement: step 16, image 1 of 3 Asus Chromebook Flip C214MA Display Assembly Replacement: step 16, image 2 of 3 Asus Chromebook Flip C214MA Display Assembly Replacement: step 16, image 3 of 3
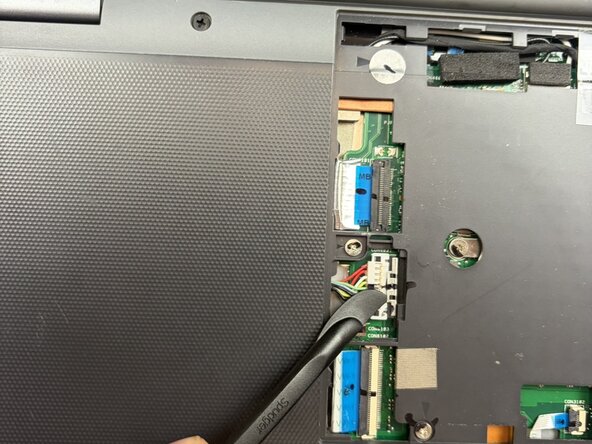
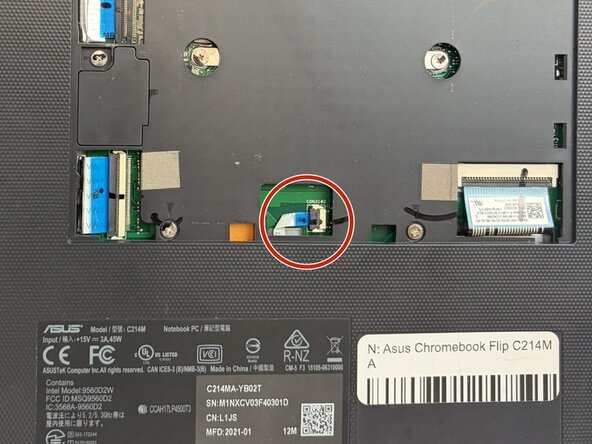
    • Use a prying tool to slide the locking clip back and disconnect the battery from the motherboard.

    Ask FixBot

    Add Comment

  17. Asus Chromebook Flip C214MA Display Assembly Replacement: step 17, image 1 of 3 Asus Chromebook Flip C214MA Display Assembly Replacement: step 17, image 2 of 3 Asus Chromebook Flip C214MA Display Assembly Replacement: step 17, image 3 of 3
    • Flip open the locking clips and unplug the daughterboard cables from the motherboard using the tweezers.

    Ask FixBot

    Add Comment

  18. Asus Chromebook Flip C214MA Display Assembly Replacement: step 18, image 1 of 2 Asus Chromebook Flip C214MA Display Assembly Replacement: step 18, image 2 of 2
    • Flip open the locking clip for the touchpad cable and unplug the touchpad cable using the prying tool.

    Ask FixBot

    Add Comment

  19. Asus Chromebook Flip C214MA Display Assembly Replacement: step 19, image 1 of 2 Asus Chromebook Flip C214MA Display Assembly Replacement: step 19, image 2 of 2
    • Use the prying tool to unplug the palmrest cable from the motherboard.

    Ask FixBot

    Add Comment

  20. Asus Chromebook Flip C214MA Display Assembly Replacement: step 20, image 1 of 2 Asus Chromebook Flip C214MA Display Assembly Replacement: step 20, image 2 of 2
    • Use tweezers to peel back the tape and unplug the LCD cable from the motherboard.

    • It might help to unseat the cable before unplugging.

    Ask FixBot

    Add Comment

  21. Asus Chromebook Flip C214MA Display Assembly Replacement: step 21, image 1 of 2 Asus Chromebook Flip C214MA Display Assembly Replacement: step 21, image 2 of 2
    • Use tweezers to unplug the sensor board cable from the motherboard and unplug the camera cable from the motherboard.

    Ask FixBot

    Add Comment

  22. Asus Chromebook Flip C214MA Display Assembly Replacement: step 22, image 1 of 3 Asus Chromebook Flip C214MA Display Assembly Replacement: step 22, image 2 of 3 Asus Chromebook Flip C214MA Display Assembly Replacement: step 22, image 3 of 3
    • Use a prying tool to flip open the locking clip and unplug the world-facing camera and microphone cable from the motherboard.

    • Unplug microphone cable from the motherboard.

    • There may be foam pieces covering the cable, you can use tweezers to pull them off.

    Ask FixBot

    Add Comment

  23. Asus Chromebook Flip C214MA Display Assembly Replacement: step 23, image 1 of 2 Asus Chromebook Flip C214MA Display Assembly Replacement: step 23, image 2 of 2
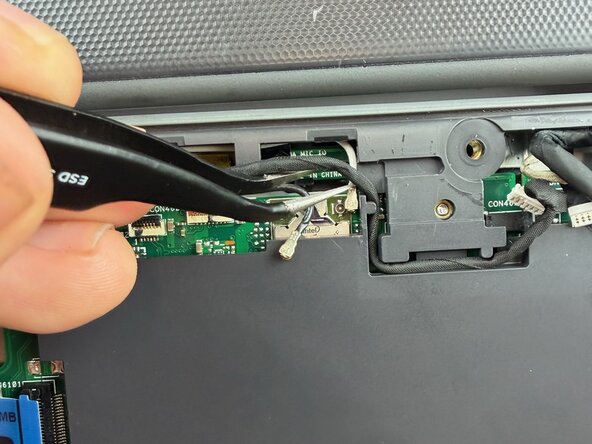
    • Gently pull the Wi-Fi antennas off the motherboard using tweezers.

    Ask FixBot

    Add Comment

  24. Asus Chromebook Flip C214MA Display Assembly Replacement: step 24, image 1 of 1
    • Flip over and open the device.

    Ask FixBot

    Add Comment

  25. Asus Chromebook Flip C214MA Display Assembly Replacement: step 25, image 1 of 1
    • Use an opening tool to pry the palmrest from the bottom cover and partially pull the palmrest.

    Ask FixBot

    Add Comment

  26. Asus Chromebook Flip C214MA Display Assembly Replacement: step 26, image 1 of 1
    • Using the tweezers to peel back the tape and pull the touchpad cable through its slot.

    Ask FixBot

    Add Comment

  27. Asus Chromebook Flip C214MA Display Assembly Replacement: step 27, image 1 of 2 Asus Chromebook Flip C214MA Display Assembly Replacement: step 27, image 2 of 2
    • Fully remove the palmrest.

    Ask FixBot

    Add Comment

  28. Asus Chromebook Flip C214MA Display Assembly Replacement: step 28, image 1 of 1
    • Remove the three 4mm Phillips screws using a Phillips screwdriver.

    • Remove the four 3mm Phillips screws

    Ask FixBot

    Add Comment

  29. Asus Chromebook Flip C214MA Display Assembly Replacement: step 29, image 1 of 1
    • Gently remove the motherboard making sure not to bend or damage the ports.

    Ask FixBot

    Add Comment

  30. Asus Chromebook Flip C214MA Display Assembly Replacement: step 30, image 1 of 2 Asus Chromebook Flip C214MA Display Assembly Replacement: step 30, image 2 of 2
    • Use the tweezers to unplug the speaker cable from the motherboard.

    Ask FixBot

    Add Comment

  31. Asus Chromebook Flip C214MA Display Assembly Replacement, Display Assembly: step 31, image 1 of 3 Asus Chromebook Flip C214MA Display Assembly Replacement, Display Assembly: step 31, image 2 of 3 Asus Chromebook Flip C214MA Display Assembly Replacement, Display Assembly: step 31, image 3 of 3
    • Use a Phillips #0 screwdriver to remove the four 7 mm screws

    • With the Phillips #0 screwdriver, remove six 6 mm screws from the bottom cover. Use a plastic opening tool or spudger to carefully pry around the edges and lift off the bottom panel.

    Ask FixBot

    Add Comment

  32. Asus Chromebook Flip C214MA Display Assembly Replacement: step 32, image 1 of 3 Asus Chromebook Flip C214MA Display Assembly Replacement: step 32, image 2 of 3 Asus Chromebook Flip C214MA Display Assembly Replacement: step 32, image 3 of 3
    • Ensure that the battery, motherboard, and all display-related cables have been fully disconnected and removed as outlined in the prerequisite guides. This includes the LCD cable, camera cable, and any antenna connections that run from the base into the display assembly.

    Ask FixBot

    Add Comment

  33. Asus Chromebook Flip C214MA Display Assembly Replacement: step 33, image 1 of 1
    • Open the device. Hold the base of the Chromebook firmly and carefully lift the display assembly away from the bottom chassis at the hinges. If you feel resistance, stop and check for any remaining screws or connections before continuing. The display assembly is now removed.

    Ask FixBot

    Add Comment

Conclusion

To reassemble your device, follow the above steps in reverse order.
Take your e-waste to an R2 or e-Stewards certified recycler.
Repair didn’t go as planned? Try some basic troubleshooting or ask our Answers community for help.

Cancel: I did not complete this guide.

Miguel Soriano

Member since: 02/04/26

351 Reputation

2 Guides authored

Team

Texas Tech, Team 41-2, Johansen Spring 2026 Member of Texas Tech, Team 41-2, Johansen Spring 2026

TTU-JOHANSEN-S26S41G2

4 Members

6 Guides authored

0 Guide Comments

Add Comment

View Statistics:

Past 24 Hours: 0

Past 7 Days: 5

Past 30 Days: 16

All Time: 35