Free Shipping on Domestic Orders $75+

Archos 101 G9 Flash Memory Replacement

Views: 721

View statistics:

Past 24 Hours:
2
Past 7 Days:
12
Past 30 Days:
67
All Time:
721
Comments: 0

No one has left comments on this guide. Will you be first?

Go to guide comments
Completed: 0

No one has marked this guide "completed." Will you be the first?

Favorites: 0

No one has favorited (and subscribed to) this guide. Will you be the first?

Time Required: 1 hour
Difficulty: Very difficult
Archos 101 G9 Flash Memory Replacement

Introduction

Go to step 1 ↓

Use this guide to replace the flash memory in your Archos 101 G9 tablet.

The Archos 101 G9 tablet flash memory, also known as flash storage, is a storage unit for the tablet. Issues with a full memory can lead to a non-functioning device. Before replacing the flash memory, try to perform a factory reset on your device to see if that can possibly help; follow this guide for instructions. If that does not work and your flash memory is still the main problem, then use this guide to replace your flash memory. Before starting, make sure to completely power off your tablet and disconnect the tablet from any external power source.

What you need

Tools

    1. Archos 101 G9 Flash Memory Replacement, Display Assembly: step 1, image 1 of 1
      • Place an iFixit opening tool in the crease where the display assembly and back of the device meet.

      • Slide the tool firmly through the crease on one side of the device, twisting as you go to create separation.

      • When you reach the corner, carefully pry the two halves of the device apart.

      • There are small clips along the edges that need to stay intact in order to properly reassemble the device. Be very gentle when prying so as not to break the clips.

      • Repeat for the remaining three sides and corners.

      Ask FixBot

      Add Comment

    2. Archos 101 G9 Flash Memory Replacement: step 2, image 1 of 2 Archos 101 G9 Flash Memory Replacement: step 2, image 2 of 2
      • Separate the halves of the device.

      • Ensure that you separate from the top and you keep the bottoms of both pieces near each other so as not to damage the ribbon cables that connect the halves.

      Ask FixBot

      Add Comment

    3. Archos 101 G9 Flash Memory Replacement: step 3, image 1 of 2 Archos 101 G9 Flash Memory Replacement: step 3, image 2 of 2
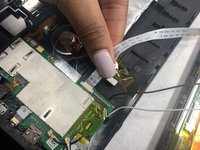
      • Gently remove both ribbon cables from their sockets on the motherboard.

      Ask FixBot

      Add Comment

    4. Archos 101 G9 Flash Memory Replacement: step 4, image 1 of 1
      • Remove the white and black coaxial cables with gold tips from the motherboard.

      Ask FixBot

      Add Comment

    5. Archos 101 G9 Flash Memory Replacement: step 5, image 1 of 1
      • Remove the display assembly from the back panel.

      Ask FixBot

      Add Comment

    1. Archos 101 G9 Flash Memory Replacement, Motherboard: step 6, image 1 of 1
      • Remove the 2 mm screw that holds the motherboard in place using a Phillips #0 screwdriver.

      Ask FixBot

      Add Comment

    2. Archos 101 G9 Flash Memory Replacement: step 7, image 1 of 1
      • Carefully remove the ribbon cable from its socket on the motherboard.

      Ask FixBot

      Add Comment

    3. Archos 101 G9 Flash Memory Replacement: step 8, image 1 of 1
      • Remove the tape covering all of the solder connections on the motherboard.

      Ask FixBot

      Add Comment

    4. Archos 101 G9 Flash Memory Replacement: step 9, image 1 of 1
      • Desolder all six of the connections that were underneath the tape.

      Ask FixBot

      Add Comment

    5. Archos 101 G9 Flash Memory Replacement: step 10, image 1 of 1
      • Remove the motherboard from the tablet.

      Ask FixBot

      Add Comment

    1. Archos 101 G9 Flash Memory Replacement, Flash Memory: step 11, image 1 of 1
      • Flip the motherboard around to the backside and pry off the silver covering using a nylon spudger.

      Ask FixBot

      Add Comment

    2. Archos 101 G9 Flash Memory Replacement: step 12, image 1 of 1
      • Remove the largest black rectangle using the Hakko microsoldering kit.

      Ask FixBot

      Add Comment

Conclusion

To reassemble your device, follow these instructions in reverse order.

Cancel: I did not complete this guide.

Deneille Davids

Member since: 10/28/21

181 Reputation

2 Guides authored

Team

UMass Dartmouth, Team 4-1, Gulbrandsen Fall 2021 Member of UMass Dartmouth, Team 4-1, Gulbrandsen Fall 2021

UMASSD-GULBRANDSEN-F21S4G1

3 Members

72 Guides authored

0 Guide Comments

Add Comment

View Statistics:

Past 24 Hours: 2

Past 7 Days: 12

Past 30 Days: 67

All Time: 721