
Archos 101 G9 Display Assembly Replacement

Clay Meunier and 2 other contributors
Last updated on Dec 22, 2021
Views: 798
View statistics:
- Past 24 Hours:
- 1
- Past 7 Days:
- 12
- Past 30 Days:
- 60
- All Time:
- 798
Comments: 1
1 guide comment.
Go to guide commentsCompleted: 0 1
No one has marked this guide "completed." Will you be the first?
1 person has marked this guide "completed." It's you — great job!
Favorites: 0 1
No one has favorited (and subscribed to) this guide. Will you be the first?
1 person has favorited (and subscribed to) this guide — and that's you!
Introduction
Go to step 1 ↓Using this guide will help you replace the display assembly on your Archos 101 G9 tablet.
The display assembly is the screen that is paired with the frame of the tablet. It is the output component to present information and is made up of the glass panel. Your display may need to be replaced if the glass cracks or is broken. Your device could also experience something called “screen burn-in.” Screen burn-in is a discoloration of areas on an electronic display. Image retention on tablets can sometimes be cured by turning the device off for about an hour. If the screen on your device is cracked, follow this guide to reinforce your screen to avoid injury until you replace the display. Make sure that your device is powered off and disconnect the device from any external power source.
What you need
Tools

-
-
-
Place an iFixit opening tool in the crease where the display assembly and back of the device meet.
-
Slide the tool firmly through the crease on one side of the device, twisting as you go to create separation.
-
When you reach the corner, carefully pry the two halves of the device apart.
-
Repeat for the remaining three sides and corners.
 Ask FixBot
-
-
-
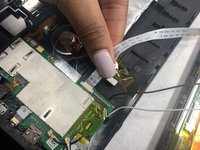
Remove the white and black coaxial cables with gold tips from the motherboard.
-
-
-




To reassemble your device, follow these instructions in reverse order.

Team

UMass Dartmouth, Team 4-1, Gulbrandsen Fall 2021 Member of UMass Dartmouth, Team 4-1, Gulbrandsen Fall 2021
UMASSD-GULBRANDSEN-F21S4G1
3 Members
72 Guides authored
