Introduction
You will be separating the camera module from the rest of the device. This include removing 3 pin tabs/ribbons from the circuit board. You will have to do this carefully as any damage done to the pins will be hard to repair. The rest is just unscrewing screws.
What you need
-
-
-
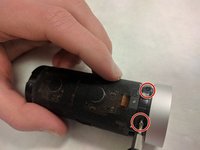
Remove two 3.55 mm screws that hold the body to the ball and socket joint using the PH000 screwhead.
 Ask FixBot
-
-
Tool used on this step:Tweezers$4.99
-
Insert the tweezers into the crevice of the ball and socket joint, and prop up the tabs to remove the white ring from the body.
-
-
-
Press the Apple logo through to pull apart the body frame from the body of the webcam.
-
-
-
-
-
-
Unscrew the 3 (3.55 mm) screws surrounding the black casing near the camera-lens.
-
-
Tool used on this step:Tweezers$4.99
-
Using tweezers, remove the netting that surrounds the black casing.
-
-
-
Gently pull out the ribbon cables at the base of the circuit board. The camera module and lens cap are connected to the board via two busses.
-
-
-
Remove the three PH000 3.55mm screws that connect the end cap that holds the privacy shutter to the rest of the camera enclosure. Once the screw are removed, you can pull them apart.
-
-
-
Unscrew the three PH000 3.55mm screws from the connecting plate and the camera enclosure. Pull apart when all screws are removed.
-
-
-
Unscrew the three PH000 3.55mm screws securing the Camera module circuit board and lens enclosure.
-
-
-
Pull the pin tab from the base of the circuit board to separate the camera module and the lens enclosure.
-




To reassemble your device, follow these instructions in reverse order.
Cancel: I did not complete this guide.
4 other people completed this guide.

Team

IUPUI, Team S5-G1, Baechle Spring 2018 Member of IUPUI, Team S5-G1, Baechle Spring 2018
IUPUI-BAECHLE-S18S5G1
3 Members
36 Guides authored
1 Guide Comment
I used a PH00 tip from my iFixit toolkit to remove all screws.
