Free Shipping on Domestic Orders $75+

Apple TV 4K Remote Logic Board Replacement

What you need

    1. Apple TV 4K Remote Logic Board Replacement, Remote Logic Board: step 1, image 1 of 1
      • Heat iOpener according to manufacturer's instructions.

      • Place over the face of the remote to soften the adhesive under the glass.

      Ask FixBot

      Add Comment

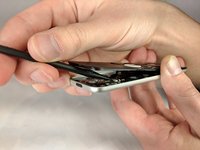
    2. Apple TV 4K Remote Logic Board Replacement: step 2, image 1 of 2 Apple TV 4K Remote Logic Board Replacement: step 2, image 2 of 2
      • Using a spudger, gently lift the face of the remote. Starting from the bottom and working your way to the top.

      Ask FixBot

      Add Comment

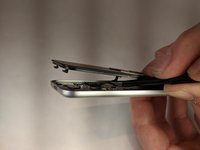
    3. Apple TV 4K Remote Logic Board Replacement: step 3, image 1 of 1
      • Push front face forward to disengage plastic clips at the top of the remote.

      Ask FixBot

      Add Comment

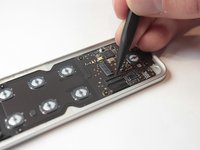
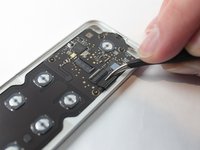
    4. Apple TV 4K Remote Logic Board Replacement: step 4, image 1 of 2 Apple TV 4K Remote Logic Board Replacement: step 4, image 2 of 2
      Tool used on this step:
      Tweezers
      $4.99
      Buy
      • Unlatch the connector that binds the touch screen and logic board.

      • Afterwards, use tweezers to detach the connector that binds the touch screen to the logic board.

      Ask FixBot

      Add Comment

    5. Apple TV 4K Remote Logic Board Replacement: step 5, image 1 of 1
      • Lift the face from the body of the remote.

      Ask FixBot

      Add Comment

    6. Apple TV 4K Remote Logic Board Replacement: step 6, image 1 of 2 Apple TV 4K Remote Logic Board Replacement: step 6, image 2 of 2
      • Lift the latch holding back the connector to the battery.

      • Use tweezers to disconnect the battery connector.

      Ask FixBot

      Add Comment

    7. Apple TV 4K Remote Logic Board Replacement: step 7, image 1 of 1
      • Remove the following screws using a T3 Torx screwdriver:

      • Eight 2mm screws

      Ask FixBot

      Add Comment

    8. Apple TV 4K Remote Logic Board Replacement: step 8, image 1 of 1
      • Using a plastic spudger, gently remove the logic board from the case of the remote.

      Ask FixBot

      Add Comment

Conclusion

To reassemble your device, follow these instructions in reverse order.

Cancel: I did not complete this guide.

4 other people completed this guide.

Keenan Barber

Member since: 10/04/18

1,367 Reputation

3 Guides authored

Team

UW Stout, Team S6-G3, Ogden Fall 2018 Member of UW Stout, Team S6-G3, Ogden Fall 2018

UWSTOUT-OGDEN-F18S6G3

4 Members

60 Guides authored

2 Guide Comments

Have you ever successfully reconnected the ribbon cable after disassembly? It seems nearly impossible to do by hand…

B R - Reply Share

I can’t find replacement adhesive that fits. How are people getting this thing to stick back together when you’re done??

Jeremy - Reply Share

Add Comment

View Statistics:

Past 24 Hours: 2

Past 7 Days: 40

Past 30 Days: 188

All Time: 9,712