Free Shipping on Domestic Orders $75+

Apple TV 1st Generation Lower Case Replacement

What you need

    1. Apple TV 1st Generation Lower Case Replacement, Lower Case: step 1, image 1 of 1
      • Flip the Apple TV over so that the bottom of the unit is facing up.

      • You need to remove the rubber base to get access to the screws.

      • Starting at one side of the device, use a hairdryer or a heat gun to soften the adhesive holding the rubber base in place.

      • The rubber base will be hot after heating, take extreme caution while proceeding to avoid personal injury.

      • While the adhesive is still warm, peel the bottom of the rubber base upwards to detach it from the metal plate.

      • The rubber base can tear if the adhesive hasn't been softened enough.

      • Repeat the procedure described above until the rubber base has been completely removed.

      Ask FixBot

      Add Comment

    2. Apple TV 1st Generation Lower Case Replacement: step 2, image 1 of 1
      • Remove the four T10 Torx screws that secure the lower case to the upper case.

      Ask FixBot

      Add Comment

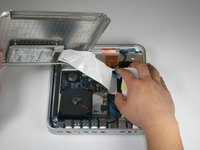
    3. Apple TV 1st Generation Lower Case Replacement: step 3, image 1 of 1
      • Carefully lift the lower case from the upper case enough to allow access to the internals of the Apple TV.

      • Be aware that the hard drive is physically attached to the lower case and that a ribbon cable runs from the drive to the logic board in the upper case.

      Ask FixBot

      Add Comment

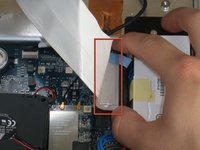
    4. Apple TV 1st Generation Lower Case Replacement: step 4, image 1 of 2 Apple TV 1st Generation Lower Case Replacement: step 4, image 2 of 2
      • Carefully pull the hard drive data cable straight up from its socket on the logic board.

      • During reassembly, make sure the hard drive data cable is firmly seated in its socket on the logic board; otherwise, during boot-up you will see a flashing question mark "?".

      Ask FixBot

      Add Comment

Conclusion

To reassemble your device, follow these instructions in reverse order.

Cancel: I did not complete this guide.

3 other people completed this guide.

CCarvalho

Member since: 11/08/09

283 Reputation

1 Guide authored

Team

Cal Poly, Team 18-5, Maness Fall 2009 Member of Cal Poly, Team 18-5, Maness Fall 2009

CPSU-MANESS-F09S18G5

5 Members

72 Guides authored

1 Guide Comment

This guide may make more sense as a teardown, since its not really showing any repairs or replacements.

Alex Jansen - Reply Share

Add Comment

View Statistics:

Past 24 Hours: 0

Past 7 Days: 8

Past 30 Days: 43

All Time: 9,031