Free Shipping on Domestic Orders $75+

Anker 2.4G Wireless Mouse Sensor Replacement

What you need

  1. Anker 2.4G Wireless Mouse Sensor Replacement, Sensor: step 1, image 1 of 1
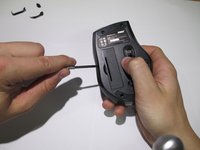
    • Using a spudger, carefully pry off the stickers to reveal the location of four screws.

    Ask FixBot

    Add Comment

  2. Anker 2.4G Wireless Mouse Sensor Replacement: step 2, image 1 of 1
    • Using your Phillips screwdriver, remove the four screws.

    Ask FixBot

    Add Comment

  3. Anker 2.4G Wireless Mouse Sensor Replacement: step 3, image 1 of 2 Anker 2.4G Wireless Mouse Sensor Replacement: step 3, image 2 of 2
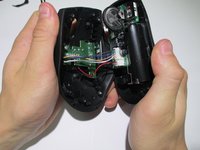
    • Using a spudger, carefully pry apart the upper and lower housing of the mouse.

    • Make sure you are not using too much pressure, as you could warp the plastic.

    Ask FixBot

    Add Comment

  4. Anker 2.4G Wireless Mouse Sensor Replacement: step 4, image 1 of 1
    • Disconnect the wires from the white crimping headers.

    • Pull as far up on the wire as possible, but be careful to avoid ripping the wires.

    Ask FixBot

    Add Comment

  5. Anker 2.4G Wireless Mouse Sensor Replacement: step 5, image 1 of 1
    • Remove the scroll wheel from the motherboard by pulling it to the left.

    • This may take some force to remove. Make sure to pull it parallel to the board, instead of perpendicularly.

    Ask FixBot

    Add Comment

  6. Anker 2.4G Wireless Mouse Sensor Replacement: step 6, image 1 of 1
    Tool used on this step:
    Anti-Static Wrist Strap
    $7.95
    Buy
    • Gently lift the motherboard away from the plastic housing.

    • Use an iFixit grounding strap or another antistatic measure to prevent sensitive components from electrostatic discharge during this step.

    Ask FixBot

    Add Comment

  7. Anker 2.4G Wireless Mouse Sensor Replacement: step 7, image 1 of 1
    • Desolder the six wires holding the I.C. in place to complete the sensor change.

    • Replace the broken sensor with the new sensor and solder back in place.

    • Make sure none of your solder connections are bridged as this can cause serious damage to your mouse.

    Ask FixBot

    Add Comment

Conclusion

To reassemble your device, follow these instructions in reverse order.

Cancel: I did not complete this guide.

2 other people completed this guide.

Ryan

Member since: 01/23/14

152 Reputation

1 Guide authored

Team

Cal Poly, Team 1-39, Maness Winter 2014 Member of Cal Poly, Team 1-39, Maness Winter 2014

CPSU-MANESS-W14S1G39

4 Members

16 Guides authored

0 Guide Comments

Add Comment

View Statistics:

Past 24 Hours: 2

Past 7 Days: 12

Past 30 Days: 75

All Time: 8,474