Introduction
The battery supplies power to the device that allows hours of playtime. If the battery isn't turning on, use the Anbernic_RG35XX_Screen_Glitch guide to determine the possible issues. This guide shows how to replace the battery.
What you need
-
-
Remove the SD card located on the right side of the device by pushing into the SD card slot and pulling the card out.
-
Remove the six 1.2 mm screws that secure the back case with a 1.5 Hex Bit screwdriver.
 Ask FixBot
-
-
-
Insert an opening tool into the MicroSD card slot and twist it clockwise to begin releasing the rear case.
-
Pry around the entire perimeter until the rear case fully releases.
-
Remove the rear case.
-
-
-
-
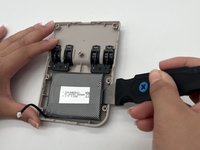
Use your fingernails or tweezers to gently remove the battery connector from its socket.
-
-
-
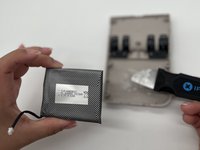
Use a spudger to gently pry around the perimeter of the battery until it releases.
-
Remove the battery.
-


To reassemble your device, follow the above steps in reverse order.
For optimal performance, after completing this guide, calibrate your newly installed battery.
Take your e-waste to an R2 or e-Stewards certified recycler.
Repair didn’t go as planned? Try some basic troubleshooting or ask our Answers community for help.
Cancel: I did not complete this guide.
2 other people completed this guide.

Team

University of North Texas, Team 6-16, Kilpatrick Fall 2024 Member of University of North Texas, Team 6-16, Kilpatrick Fall 2024
UNT-KILPATRICK-F24S6G16
3 Members
5 Guides authored