Introduction
Prerequisites
- Follow the procedure in Before working inside your computer
CAUTION: Solid-state drives are fragile. Exercise care when handling the solid-state drive.
CAUTION: To avoid data loss, do not remove the solid-state drive while the computer is in sleep or on state.
This computer supports two solid-state drive form factors in SSD slot one:
● M.2 2230
● M.2 2280
What you need
-
-
-
Remove the two screws (M2.5x5) that secure the base cover to the palm-rest and keyboard assembly.
-
New line. Loosen the two captive screws (M2.5x8.5+3.5) that secure the base cover to the palm-rest and keyboard assembly
-
Loosen the four captive screws (M2.5x1.7+3.3) that secure the base cover to the palm-rest and keyboard assembly.
 Ask FixBot
-
-
-
Using your fingertips, pry open the base cover from the middle of the front edge of base cover, and then pry the left and right sides of the base cover.
-
Lift the base cover off the palm-rest and keyboard assembly.
-
-
-
-
Disconnect the battery cable from the system board.
-
Turn your computer over and press the power button for 20 seconds to drain the flea power
-
-
-
-
-
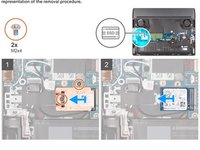
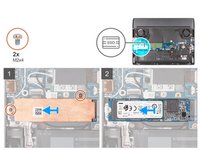
Remove the two screws (M2x4) that secure the thermal shield to the solid-state drive and the system board.
-
Lift the thermal shield off the solid-state drive.
-
Slide and lift the solid-state drive off the solid-state drive slot on the system board.
-
-
-
Slide to remove the screw mount from the palm-rest and keyboard assembly.
-
Slide the screw mount into the other screw mount slot on the palm-rest and keyboard assembly.
-
-



To reassemble your device, follow these instructions in reverse order.
Cancel: I did not complete this guide.
One other person completed this guide.

