
Alienware Alpha R2 Solid State Drive Replacement

Andrew Pham Garcia and 3 other contributors
Last updated on Dec 23, 2025
Views: 4.5K
View statistics:
- Past 24 Hours:
- 4
- Past 7 Days:
- 17
- Past 30 Days:
- 91
- All Time:
- 4,496
Comments: 0
No one has left comments on this guide. Will you be first?
Go to guide commentsCompleted: 2 3
2 people have marked this guide "completed." Will you be next?
3 people have marked this guide "completed." Including you — great job!
Favorites: 0 1
No one has favorited (and subscribed to) this guide. Will you be the first?
1 person has favorited (and subscribed to) this guide — and that's you!
Introduction
Go to step 1 ↓The following procedure will guide the reader through replacing the solid state drive (SSD) in the Alienware Alpha R2 desktop computer. The storage drive of a computer is where a computer’s operating system is stored, along with all of the data on the computer. Whenever a computer is booted, the operating system is loaded from the storage drive.
You might be wondering, “why replace a solid state drive”? If your computer is constantly freezing or if there is a long interval of a blank screen when turning on your computer, it is probably due to a faulty storage drive. Fortunately, a replacement solid state drive can return your computer back to its former glory, making your computer boot and function much faster, and saving you a lot time and frustration.
Replacing a faulty drive with a functional solid state drive will increase the speed of your computer, as it will be able to both load the OS faster, resulting in a quicker boot time, and also access files faster, resulting in a snappier response time overall.
What you need
Tools


-
-
-
Unplug the device.
-
Press the power button and hold it for approximately 10 seconds to discharge any power stored in the device.
 Ask FixBot
-
-
-
Flip the PC upside down.
-
Unscrew the case screws from each corner of the bottom of the case using a Phillips #2 screwdriver.
-
-
-
Pry open the case by splitting the seam at the bottom edge of the PC.
-
Lift the top half of the case to seperate the cover from the rest of the PC.
-
-
-
Press the two tabs located on each side of the CPU fan cover.
-
Lift the fan upwards and out to remove it.
-
(Optional) Pull the CPU's fan cable from its socket on the motherboard.
-
-
-
Disconnect the GPU fan cable from its socket on the motherboard.
-
Press the side tabs of the GPU fan case.
-
Simultaneously lift the fan cover up and forward to remove.
-
-
-
-
Pry the tabs on either side of the RAM holder away from each other with your fingers.
-
Lift forwards and upwards to remove RAM from its slot on the motherboard.
-
-
-
Face the SSD upwards.
-
Line up the pins on the SSD with the M2 slot on the motherboard.
-
Gently push the SSD into the slot where the pins line up.
-
Gently press the SSD towards the motherboard.
-
Screw in the retaining screw for the SSD using a Phillips #1 screwdriver.
-
-


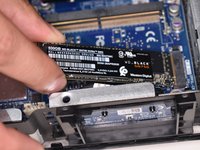


Congratulations, You have now successfully upgraded your Hard Drive Disk to a Solid State Drive. To reassemble, follow the steps in reverse order.
Cancel: I did not complete this guide.
2 other people completed this guide.

Team

University of North Texas, Team S1-G10, Raign Fall 2020 Member of University of North Texas, Team S1-G10, Raign Fall 2020
UNT-RAIGN-F20S1G10
2 Members
12 Guides authored
