Free Shipping on Domestic Orders $75+

Alienware AW610M USB-C Charging Port Replacement

What you need

  1. Alienware AW610M USB-C Charging Port Replacement, Battery: step 1, image 1 of 3 Alienware AW610M USB-C Charging Port Replacement, Battery: step 1, image 2 of 3 Alienware AW610M USB-C Charging Port Replacement, Battery: step 1, image 3 of 3
    • Power off the mouse and disconnect any wired connections.

    Ask FixBot

    Add Comment

  2. Alienware AW610M USB-C Charging Port Replacement: step 2, image 1 of 2 Alienware AW610M USB-C Charging Port Replacement: step 2, image 2 of 2
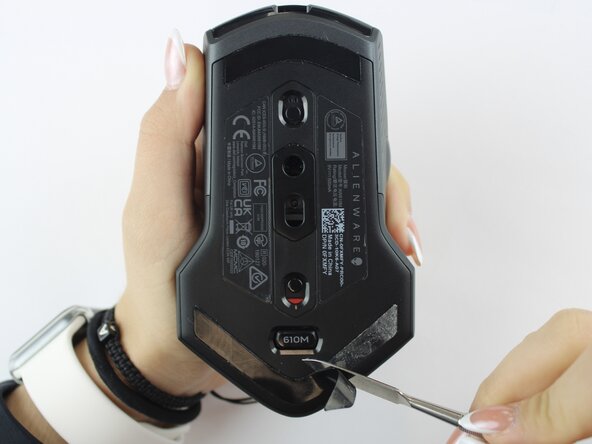
    • Use a spudger to gently lift and remove the old mouse feet.

    • If the feet are sticky, try lifting slowly from one corner to avoid tearing them.

    • Be careful not to scratch the mouse surface or damage the plastic housing.

    Ask FixBot

    Add Comment

  3. Alienware AW610M USB-C Charging Port Replacement: step 3, image 1 of 2 Alienware AW610M USB-C Charging Port Replacement: step 3, image 2 of 2
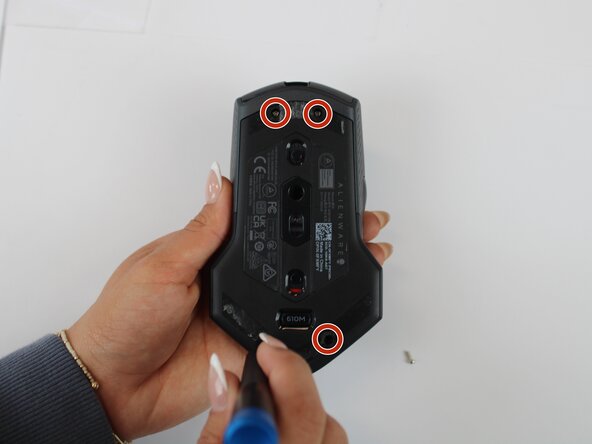
    • Remove the four 6.5 mm screws using a Y1 Tri-Point screwdriver.

    Ask FixBot

    Add Comment

  4. Alienware AW610M USB-C Charging Port Replacement: step 4, image 1 of 2 Alienware AW610M USB-C Charging Port Replacement: step 4, image 2 of 2
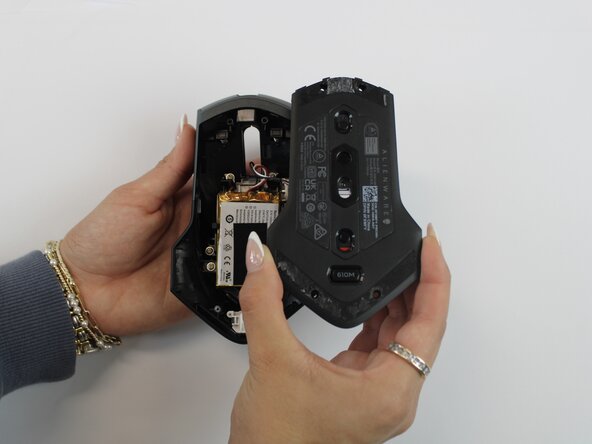
    • Using an opening tool, gently pry apart the two halves of the mouse case. Start at the seam and work your way around until the housing is separated.

    • Don't pull the halves completely apart, as internal wires still connect them.

    Ask FixBot

    Add Comment

  5. Alienware AW610M USB-C Charging Port Replacement: step 5, image 1 of 3 Alienware AW610M USB-C Charging Port Replacement: step 5, image 2 of 3 Alienware AW610M USB-C Charging Port Replacement: step 5, image 3 of 3
    • Remove the battery pack inside the mouse.

    • If you are having trouble, use a small flat tool to help ease it out.

    • The battery is lightly glued to the mouse, so ease it out gently to avoid breaking the battery or wiring

    Ask FixBot

    Add Comment

  6. Alienware AW610M USB-C Charging Port Replacement: step 6, image 1 of 2 Alienware AW610M USB-C Charging Port Replacement: step 6, image 2 of 2
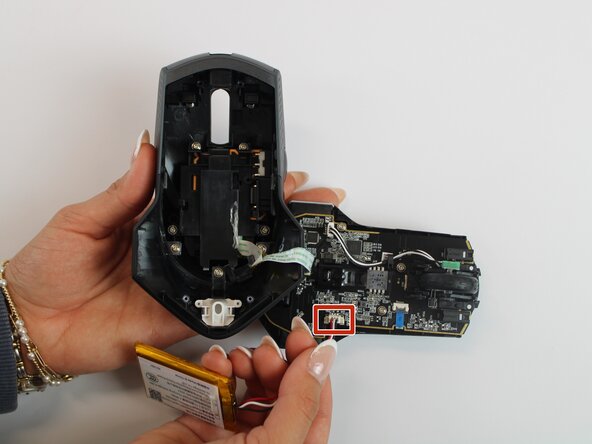
    • Remove the old battery from its spot. Lift the wire connector away from the mainboard to disconnect it.

    • Make sure all wires are inside the mouse before sealing it shut for easy reassembly.

    Ask FixBot

    Add Comment

  7. Alienware AW610M USB-C Charging Port Replacement, Motherboard: step 7, image 1 of 2 Alienware AW610M USB-C Charging Port Replacement, Motherboard: step 7, image 2 of 2
    • Remove the single 5.4 mm screw using a Phillips #1 screwdriver.

    • Detach the cable connector, and remove the scroll wheel.

    • Gently detach the last connector using your fingers.

    • Be careful when unplugging all connectors to prevent tearing them.

    Ask FixBot

    Add Comment

  8. Alienware AW610M USB-C Charging Port Replacement: step 8, image 1 of 2 Alienware AW610M USB-C Charging Port Replacement: step 8, image 2 of 2
    • Detach the blue ribbon that connects the motherboard to the shell casing.

    • Using a Phillips #1 screw driver, remove two 5.4 mm screws to detach the motherboard from the base shell casing.

    Ask FixBot

    Add Comment

  9. Alienware AW610M USB-C Charging Port Replacement: step 9, image 1 of 3 Alienware AW610M USB-C Charging Port Replacement: step 9, image 2 of 3 Alienware AW610M USB-C Charging Port Replacement: step 9, image 3 of 3
    • Gently detach the motherboard using your fingers.

    Ask FixBot

    Add Comment

  10. Alienware AW610M USB-C Charging Port Replacement, USB-C Charging Port: step 10, image 1 of 3 Alienware AW610M USB-C Charging Port Replacement, USB-C Charging Port: step 10, image 2 of 3 Alienware AW610M USB-C Charging Port Replacement, USB-C Charging Port: step 10, image 3 of 3
    • Turn the motherboard over to the back side. Using a soldering iron at 450 degrees Celsius, and a solder pad, desolder the two points where the USB-C port connects to the motherboard.

    • Remove the USB-C port with a pair of tweezers.

    • Be very cautious when desoldering, as the tool is at high heat and can burn you, as well as damage other parts of the motherboard.

    Ask FixBot

    Add Comment
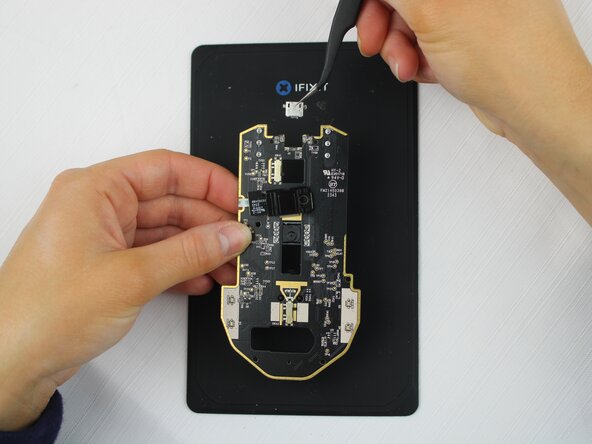
  11. Alienware AW610M USB-C Charging Port Replacement: step 11, image 1 of 2 Alienware AW610M USB-C Charging Port Replacement: step 11, image 2 of 2
    • Align the replacement USB port with the motherboard using a pair of tweezers and proceed to solder the replacement onto the motherboard at 450 degrees Celsius.

    • Gently wiggle the replacement USB-C port to ensure that it is secure.

    • To avoid burning yourself, give the replacement USB-C port time to cool down when connected.

    Ask FixBot

    Add Comment

Conclusion

To reassemble your device, follow these instructions in reverse order.

Cancel: I did not complete this guide.

Elizabeth Johnson

Member since: 09/24/25

85 Reputation

1 Guide authored

Team

Texas Tech, Team 46-4, Johansen Fall 2025 Member of Texas Tech, Team 46-4, Johansen Fall 2025

TTU-JOHANSEN-F25S46G4

4 Members

5 Guides authored

1 Guide Comment

Hi, this mouse have a Micro USB port not a Type-C.

Benjamin Szemok - Reply Share

Add Comment

View Statistics:

Past 24 Hours: 0

Past 7 Days: 6

Past 30 Days: 26

All Time: 196