Free Shipping on Domestic Orders $75+

Alienware AW510H Audio Port Replacement

What you need

  1. Alienware AW510H Audio Port Replacement, Earpad Cushions: step 1, image 1 of 1
    • Hold the earcup with one hand and firmly grip the ear pad with the other.

    Ask FixBot

    Add Comment

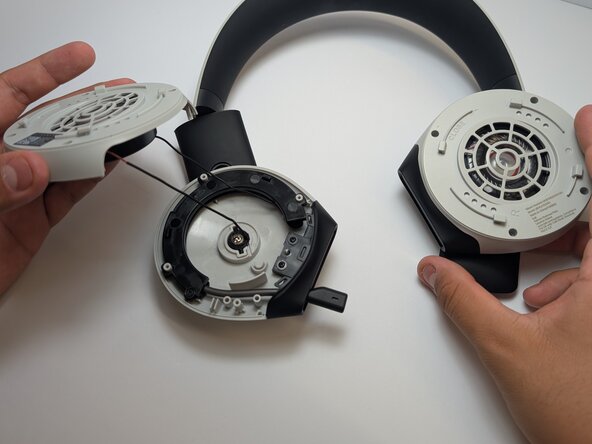
  2. Alienware AW510H Audio Port Replacement: step 2, image 1 of 3 Alienware AW510H Audio Port Replacement: step 2, image 2 of 3 Alienware AW510H Audio Port Replacement: step 2, image 3 of 3
    • Rotate the earcup counter-clockwise before pulling it away from the headset.

    Ask FixBot

    Add Comment

  3. Alienware AW510H Audio Port Replacement, Microphone Assembly: step 3, image 1 of 2 Alienware AW510H Audio Port Replacement, Microphone Assembly: step 3, image 2 of 2
    • Remove the four 8.5mm screws found on the base of the left ear cup housing using a Phillips #0 screwdriver.

    Ask FixBot

    Add Comment

  4. Alienware AW510H Audio Port Replacement: step 4, image 1 of 1
    • Gently lift the plastic shell, being cautious of the wire that is still attached.

    Ask FixBot

    Add Comment

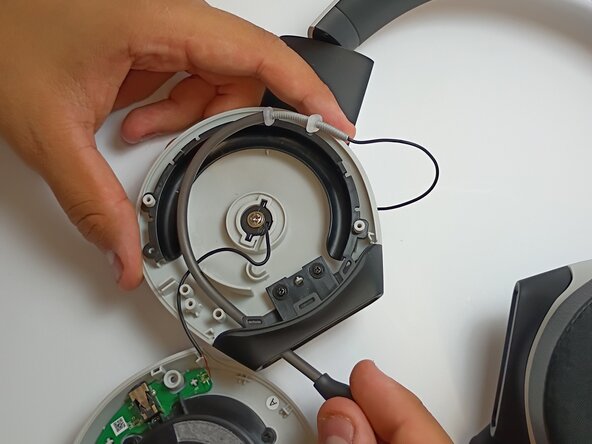
  5. Alienware AW510H Audio Port Replacement: step 5, image 1 of 1
    • Remove the 5mm screw from the microphone cover using a Phillips #1 screwdriver.

    • Follow the microphone boom connection to the driver and motherboard.

    • The retractable and bendable microphone is located on the left side.

    Ask FixBot

    Add Comment

  6. Alienware AW510H Audio Port Replacement: step 6, image 1 of 1
    • If there is a protective plastic or glue coating on top of the solder, scrape it off using a metal spudger before desoldering.

    Ask FixBot

    Add Comment

  7. Alienware AW510H Audio Port Replacement: step 7, image 1 of 1
    • Use a soldering iron to disconnect the wire connecting the microphone to the motherboard.

    Ask FixBot

    Add Comment

  8. Alienware AW510H Audio Port Replacement: step 8, image 1 of 3 Alienware AW510H Audio Port Replacement: step 8, image 2 of 3 Alienware AW510H Audio Port Replacement: step 8, image 3 of 3
    • Pull the old microphone assembly out of the housing.

    • If the mechanism is stuck inside, gently push it out from inside the housing, perhaps with the help of tweezers or small needle nose pliers.

    Ask FixBot

    Add Comment

  9. Alienware AW510H Audio Port Replacement, Motherboard: step 9, image 1 of 3 Alienware AW510H Audio Port Replacement, Motherboard: step 9, image 2 of 3 Alienware AW510H Audio Port Replacement, Motherboard: step 9, image 3 of 3
    • Desolder the motherboard from the driver casing.

    • Remember to follow safety precautions for soldering.

    Ask FixBot

    Add Comment

  10. Alienware AW510H Audio Port Replacement, Audio Port: step 10, image 1 of 3 Alienware AW510H Audio Port Replacement, Audio Port: step 10, image 2 of 3 Alienware AW510H Audio Port Replacement, Audio Port: step 10, image 3 of 3
    • Desolder the four connection-points from the motherboard.

    • Remember to desolder in a well-ventilated area and take any necessary precautions to protect your skin from the heated metal and tool.

    Ask FixBot

    Add Comment

  11. Alienware AW510H Audio Port Replacement: step 11, image 1 of 3 Alienware AW510H Audio Port Replacement: step 11, image 2 of 3 Alienware AW510H Audio Port Replacement: step 11, image 3 of 3
    • Flip over once desoldered and use tweezers to lift off the motherboard.

    Ask FixBot

    Add Comment

Conclusion

To reassemble your device, follow these instructions in reverse order.

Cancel: I did not complete this guide.

0 Guide Comments

Add Comment

View Statistics:

Past 24 Hours: 0

Past 7 Days: 6

Past 30 Days: 25

All Time: 116