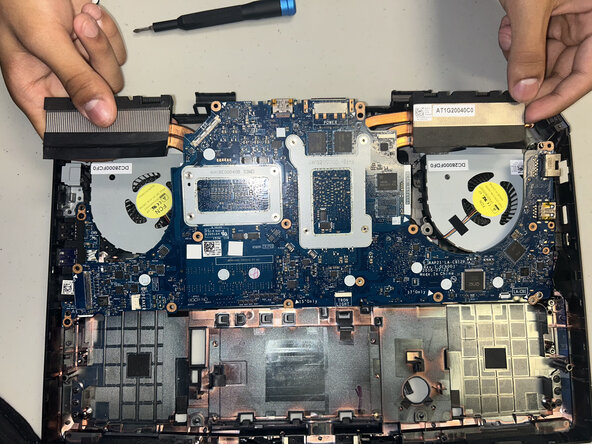
Free Shipping on Domestic Orders $75+

Alienware 15 R2 Motherboard Replacement

What you need

  1. Alienware 15 R2 Motherboard Replacement, Motherboard: step 1, image 1 of 3 Alienware 15 R2 Motherboard Replacement, Motherboard: step 1, image 2 of 3 Alienware 15 R2 Motherboard Replacement, Motherboard: step 1, image 3 of 3
    • Place laptop upside down with the hinge facing you, then remove the two 9 mm Phillips #0 screws located in the bottom left and right of the of the rear panel.

    • Remove the rear panel by using the iFixit opening tool to separate it from the back of the laptop.

  2. Alienware 15 R2 Motherboard Replacement: step 2, image 1 of 2 Alienware 15 R2 Motherboard Replacement: step 2, image 2 of 2
    • Use the iFixit opening tool to disconnect the battery cable. Put the iFixit tool underneath the cable and then pull it to remove.

  3. Alienware 15 R2 Motherboard Replacement: step 3, image 1 of 2 Alienware 15 R2 Motherboard Replacement: step 3, image 2 of 2
    • Two clips secure each RAM module in place, one on each side. Using your fingers, spread the clips away from the RAM module.

    • Repeat for the second module.

  4. Alienware 15 R2 Motherboard Replacement: step 4, image 1 of 2 Alienware 15 R2 Motherboard Replacement: step 4, image 2 of 2
    • Using a Phillips #0 screw driver remove the 3 mm screw behind where the RAM used to be.

    • If you installed additional SSD's, you will need to remove those as well.

  5. Alienware 15 R2 Motherboard Replacement: step 5, image 1 of 2 Alienware 15 R2 Motherboard Replacement: step 5, image 2 of 2
    • Remove all screws from the back casing using a Phillips #0 screw driver. (4X 18mm, 4X 10mm, 6X 6mm)

    • Press your finger in the hole next to the hard drive to lift the key board. You may need an iFixit opening tool and work your way around the edges of the keyboard to get it fully lifted.

    • Move slowly as the power cable at the front of the keyboard is still attached to the motherboard as well as the ribbon cables.

  6. Alienware 15 R2 Motherboard Replacement: step 6, image 1 of 1
    • Using a Phillips #0 screw driver remove the 2X 3mm screws.

  7. Alienware 15 R2 Motherboard Replacement: step 7, image 1 of 1
    • Using a Phillips #0 screw driver remove the 6X 8mm screws.

  8. Alienware 15 R2 Motherboard Replacement: step 8, image 1 of 1
    • Disconnect the cables.

  9. Alienware 15 R2 Motherboard Replacement: step 9, image 1 of 2 Alienware 15 R2 Motherboard Replacement: step 9, image 2 of 2
    • Remove the motherboard using an iFixit opening tool anytime it becomes difficult to get out.

Conclusion

To reassemble your device, follow these instructions in reverse order.

Alexander Lewis

Member since: 09/08/25

169 Reputation

1 Guide authored

0 Guide Comments

Add Comment

View Statistics:

Past 24 Hours: 0

Past 7 Days: 6

Past 30 Days: 28

All Time: 122