Free Shipping on Domestic Orders $75+

Acer Ferarri 4000 Hard Drive Replacement

What you need

    1. Acer Ferarri 4000 Hard Drive Replacement, Hard Drive: step 1, image 1 of 2 Acer Ferarri 4000 Hard Drive Replacement, Hard Drive: step 1, image 2 of 2
      • The Ferrari 4000 ships with a PATA hard drive, which you will have the full knowledge to replace time and time again once you're done.

      • It's so easy, even a caveman can do it.

      • I cannot endorse the previous point since all cavemen are extinct.

      Ask FixBot

      Add Comment

    2. Acer Ferarri 4000 Hard Drive Replacement, Opening Up the Laptop: step 2, image 1 of 3 Acer Ferarri 4000 Hard Drive Replacement, Opening Up the Laptop: step 2, image 2 of 3 Acer Ferarri 4000 Hard Drive Replacement, Opening Up the Laptop: step 2, image 3 of 3
      • Let's get started by removing these two Phillips #0 screws holding down the hard drive bay cover on the bottom of the computer near the 3 USB ports.

      • These screws do not come completely out - they are meant to stay attached to the cover so you don't lose them.

      • Lift the bay cover to expose the drive cover

      Ask FixBot

      Add Comment

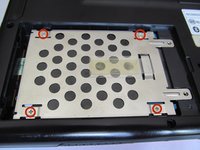
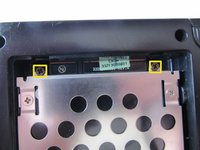
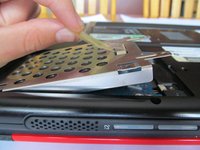
    3. Acer Ferarri 4000 Hard Drive Replacement, Protective Grille: step 3, image 1 of 3 Acer Ferarri 4000 Hard Drive Replacement, Protective Grille: step 3, image 2 of 3 Acer Ferarri 4000 Hard Drive Replacement, Protective Grille: step 3, image 3 of 3
      • The only thing separating you from the hard drive glory is a drive cover that looks oddly like a sports car grille...

      • Remove the 4 Phillips #0 screws.

      • Do not lift the cover just yet: there are two more screws securing it to the computer. If you lift it now, you risk bending the metal and damaging the cover.

      • Pull the tab to free the grille from the drive.

      Ask FixBot

      Add Comment

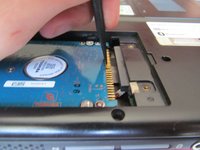
    4. Acer Ferarri 4000 Hard Drive Replacement, Removal: step 4, image 1 of 3 Acer Ferarri 4000 Hard Drive Replacement, Removal: step 4, image 2 of 3 Acer Ferarri 4000 Hard Drive Replacement, Removal: step 4, image 3 of 3
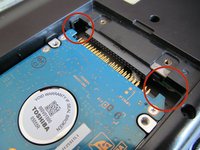
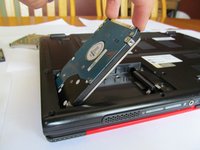
      • Pull back with a spudger (or your fingernails) where the drive plugs in to the computer.

      • Put your fingers where the red circles are and swing the drive up. Once it's up an adequate amount, grab it by its sides and pull it out of the computer.

      Ask FixBot

      Add Comment

    5. Acer Ferarri 4000 Hard Drive Replacement, You're finished!: step 5, image 1 of 1
      • You're done with the removal! Follow these instructions in reverse to install the new drive.

      Ask FixBot

      Add Comment

Conclusion

To reassemble your device, follow these instructions in reverse order.

Cancel: I did not complete this guide.

5 other people completed this guide.

Nathanael

Member since: 02/03/14

1,004 Reputation

2 Guides authored

0 Guide Comments

Add Comment

View Statistics:

Past 24 Hours: 1

Past 7 Days: 10

Past 30 Days: 50

All Time: 3,831