Free Shipping on Domestic Orders $75+

ASUS ROG G46VW Motherboard Replacement

Views: 3K

View statistics:

Past 24 Hours:
1
Past 7 Days:
13
Past 30 Days:
75
All Time:
2,980
Comments: 1

1 comment on steps.

Completed: 3

3 people have marked this guide "completed." Will you be next?

Favorites: 0

No one has favorited (and subscribed to) this guide. Will you be the first?

Time Required: 45 - 50 minutes
Difficulty: Moderate
Action Shots

Be an action hero! This guide needs images that better demonstrate how to perform specific actions.

ASUS ROG G46VW Motherboard Replacement

Introduction

Go to step 1 ↓

If your Asus ROG G46VW laptop is not powering on, overheating, or experiencing major hardware issues, the motherboard may need to be replaced. This guide shows you how to remove and replace the motherboard.

If you are unsure whether the motherboard is the issue, check that the battery, charger, and RAM are functioning properly before proceeding.

The motherboard is the main circuit board of the laptop and supports all its major components, including the CPU, RAM, storage, and I/O subsystems.

This repair requires disassembling several internal components and is best suited for users who are comfortable working with small electronics.

Before beginning, power off the device and disconnect it from any external power source. Take care when handling internal components to avoid damage from static electricity.

What you need

Parts

Tools

    1. ASUS ROG G46VW Motherboard Replacement, RAM: step 1, image 1 of 2 ASUS ROG G46VW Motherboard Replacement, RAM: step 1, image 2 of 2
      • Lift the screw cover and remove the screw using a Phillips #0 screwdriver.

      Ask FixBot

      Add Comment

    2. ASUS ROG G46VW Motherboard Replacement: step 2, image 1 of 1
      • Remove the RAM cover by lifting the screw cover and pulling away firmly.

      Ask FixBot

      Add Comment

    3. ASUS ROG G46VW Motherboard Replacement: step 3, image 1 of 2 ASUS ROG G46VW Motherboard Replacement: step 3, image 2 of 2
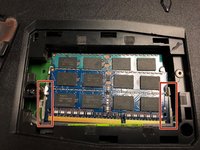
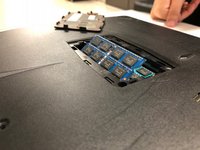
      • Push outwards on the clips to release the RAM stick. The stick should pop up at an angle.

      Ask FixBot

      Add Comment

    4. ASUS ROG G46VW Motherboard Replacement: step 4, image 1 of 1
      • Pull out the RAM stick carefully.

      • Do not use a prying motion as this will damage the hardware. Be careful not to damage the gold section of the RAM stick.

      Ask FixBot

      Add Comment

    5. ASUS ROG G46VW Motherboard Replacement: step 5, image 1 of 1
      • Repeat steps 3-4 to remove the second RAM stick.

      Ask FixBot

      Add Comment

    1. ASUS ROG G46VW Motherboard Replacement, Speaker Cover: step 6, image 1 of 1
      • Gently pry the back hinge cover piece away from the device.

      Ask FixBot

      Add Comment

    2. ASUS ROG G46VW Motherboard Replacement: step 7, image 1 of 1
      • Disconnect the speaker cable from the motherboard.

      Ask FixBot

      Add Comment

    1. ASUS ROG G46VW Motherboard Replacement, Keyboard: step 8, image 1 of 1
      • Remove the two screws from underneath the RAM cover.

      Ask FixBot

      Add Comment

    2. ASUS ROG G46VW Motherboard Replacement: step 9, image 1 of 1
      • Remove all of the screws from the bottom of the case.

      • If replacing the screen, remove the rubber feet to reveal two more screws.

      Ask FixBot

      Add Comment

    3. ASUS ROG G46VW Motherboard Replacement: step 10, image 1 of 1
      • Turn the laptop over and remove the screws as shown

      Ask FixBot

      Add Comment

    4. ASUS ROG G46VW Motherboard Replacement: step 11, image 1 of 1
      • Carefully pry the keyboard away using your spudger and the opening tools.

      • Be sure not to damage the clips holding the keyboard to the bottom case.

      Ask FixBot

      Add Comment

    5. ASUS ROG G46VW Motherboard Replacement: step 12, image 1 of 2 ASUS ROG G46VW Motherboard Replacement: step 12, image 2 of 2
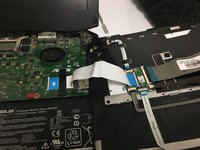
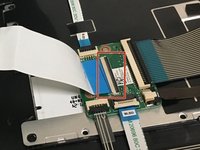
      • Detach the ribbon cable by releasing the clip

      Ask FixBot

      Add Comment

    1. ASUS ROG G46VW Motherboard Replacement, Screen: step 13, image 1 of 2 ASUS ROG G46VW Motherboard Replacement, Screen: step 13, image 2 of 2
      • Remove screws from silver braces.

      Ask FixBot

      Add Comment

    2. ASUS ROG G46VW Motherboard Replacement: step 14, image 1 of 1
      Tool used on this step:
      Tweezers
      $4.99
      Buy
      • Use tweezers to remove golden screw caps.

      Ask FixBot

      Add Comment

    3. ASUS ROG G46VW Motherboard Replacement: step 15, image 1 of 1
      • Remove tape and gently pull up on golden cap connectors to disconnect them.

      Ask FixBot

      Add Comment

    4. ASUS ROG G46VW Motherboard Replacement: step 16, image 1 of 1
      • Gently pull the white connector until it comes loose.

      Ask FixBot

      Add Comment

    1. ASUS ROG G46VW Motherboard Replacement, Indicator Lights: step 17, image 1 of 1
      • With the motherboard exposed, locate the Indicator Lights and their white plastic housing piece.

      Ask FixBot

      Add Comment

    2. ASUS ROG G46VW Motherboard Replacement: step 18, image 1 of 1
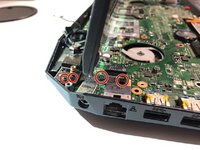
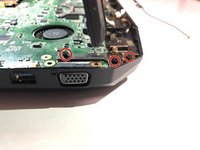
      • Remove all 3 screws from the motherboard connection using the Phillips #0 screwdriver.

      • Pull the plastic white housing piece away from the case.

      Ask FixBot

      Add Comment

    3. ASUS ROG G46VW Motherboard Replacement: step 19, image 1 of 1
      • Locate the flat LED cable that connects the lights to the motherboard.

      • Flip the black cover upwards before pulling on the cable.

      • Repeat for the other connector piece.

      Ask FixBot

      Add Comment

    1. ASUS ROG G46VW Motherboard Replacement, Motherboard: step 20, image 1 of 1
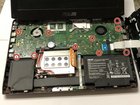
      • Remove the 10 screws securing the motherboard using a Phillips #0 screwdriver.

      Ask FixBot

      Add Comment

    2. ASUS ROG G46VW Motherboard Replacement: step 21, image 1 of 1
      • Lift the motherboard out of the laptop.

      • Use care when lifting the motherboard to avoid damaging attached components.

      Ask FixBot

      Add Comment

Conclusion

To reassemble your device, follow these instructions in reverse order.

Cancel: I did not complete this guide.

3 other people completed this guide.

0 Guide Comments

Add Comment

View Statistics:

Past 24 Hours: 1

Past 7 Days: 13

Past 30 Days: 75

All Time: 2,980