Free Shipping on Domestic Orders $75+

ASUS Chromebook Flip C214MA Battery Replacement

What you need

    1. ASUS Chromebook Flip C214MA Battery Replacement, Battery: step 1, image 1 of 1
      • Use a Phillips #0 screwdriver to remove the single 5 mm screw from the smaller back panel.

      Ask FixBot

      Add Comment

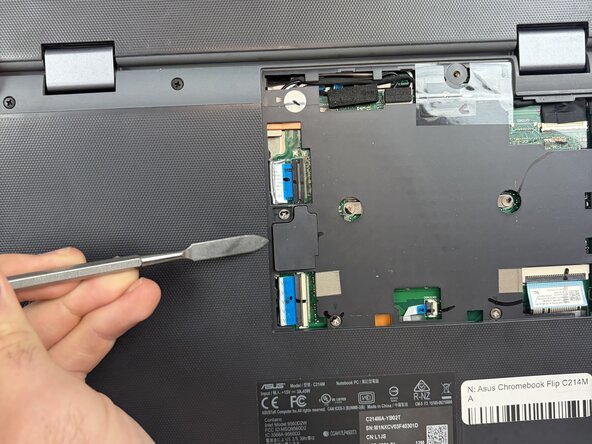
    2. ASUS Chromebook Flip C214MA Battery Replacement: step 2, image 1 of 3 ASUS Chromebook Flip C214MA Battery Replacement: step 2, image 2 of 3 ASUS Chromebook Flip C214MA Battery Replacement: step 2, image 3 of 3
      • Use a spudger or opening tool to remove the battery access panel.

      Ask FixBot

      Add Comment

    3. ASUS Chromebook Flip C214MA Battery Replacement: step 3, image 1 of 3 ASUS Chromebook Flip C214MA Battery Replacement: step 3, image 2 of 3 ASUS Chromebook Flip C214MA Battery Replacement: step 3, image 3 of 3
      • Use the spudger to remove the battery connector panel.

      Ask FixBot

      Add Comment

    4. ASUS Chromebook Flip C214MA Battery Replacement: step 4, image 1 of 2 ASUS Chromebook Flip C214MA Battery Replacement: step 4, image 2 of 2
      • Disconnect the battery cable. Use the tip of a spudger or your fingernail to flip up the small locking flap, then gently pull the cable out of the connector.

      • Do not pull on the wires. Pull from the connector only.

      Ask FixBot

      Add Comment

    5. ASUS Chromebook Flip C214MA Battery Replacement: step 5, image 1 of 3 ASUS Chromebook Flip C214MA Battery Replacement: step 5, image 2 of 3 ASUS Chromebook Flip C214MA Battery Replacement: step 5, image 3 of 3
      • Disconnect the keyboard ribbon, touchpad ribbon, microphone ribbon, and camera ribbon. Use the spudger to lift each locking tab before removing the ribbon cables.

      Ask FixBot

      Add Comment

    6. ASUS Chromebook Flip C214MA Battery Replacement: step 6, image 1 of 1
      • Remove the four 5 mm Phillips #0 screws from the inside of the panel.

      Ask FixBot

      Add Comment

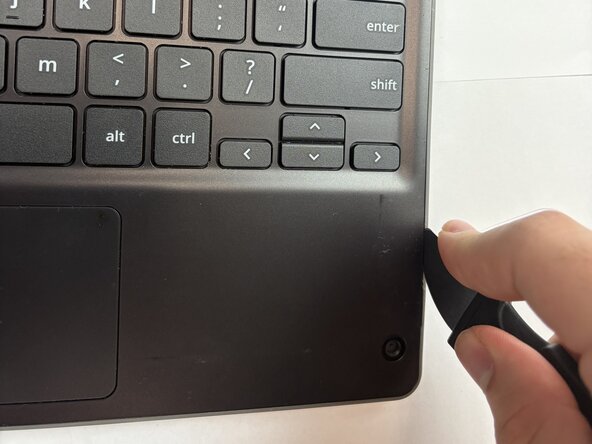
    7. ASUS Chromebook Flip C214MA Battery Replacement: step 7, image 1 of 3 ASUS Chromebook Flip C214MA Battery Replacement: step 7, image 2 of 3 ASUS Chromebook Flip C214MA Battery Replacement: step 7, image 3 of 3
      • Flip the device over and open it. Use a spudger to unclip and remove the palm rest from the bottom cover.

      Ask FixBot

      Add Comment

    8. ASUS Chromebook Flip C214MA Battery Replacement: step 8, image 1 of 1
      • Remove the two 2 mm Phillips #0 screws from the battery cover.

      Ask FixBot

      Add Comment

    9. ASUS Chromebook Flip C214MA Battery Replacement: step 9, image 1 of 2 ASUS Chromebook Flip C214MA Battery Replacement: step 9, image 2 of 2
      • Use tweezers to pull the battery cable from beneath the motherboard.

      Ask FixBot

      Add Comment

    10. ASUS Chromebook Flip C214MA Battery Replacement: step 10, image 1 of 3 ASUS Chromebook Flip C214MA Battery Replacement: step 10, image 2 of 3 ASUS Chromebook Flip C214MA Battery Replacement: step 10, image 3 of 3
      • Flip the device back over onto the top cover. Disconnect the USB cables from the motherboard.

      Ask FixBot

      Add Comment

    11. ASUS Chromebook Flip C214MA Battery Replacement: step 11, image 1 of 2 ASUS Chromebook Flip C214MA Battery Replacement: step 11, image 2 of 2
      • Carefully untuck the USB cables from beneath the motherboard.

      Ask FixBot

      Add Comment

    12. ASUS Chromebook Flip C214MA Battery Replacement: step 12, image 1 of 3 ASUS Chromebook Flip C214MA Battery Replacement: step 12, image 2 of 3 ASUS Chromebook Flip C214MA Battery Replacement: step 12, image 3 of 3
      • Lift the battery out of the device. The battery is now removed. To reassemble the device, follow these steps in reverse order.

      Ask FixBot

      Add Comment

Conclusion

To reassemble your device, follow the above steps in reverse order.
For optimal performance, after completing this guide, calibrate your newly installed battery.
Take your e-waste to an R2 or e-Stewards certified recycler.
Repair didn’t go as planned? Try some basic troubleshooting or ask our Answers community for help.

Cancel: I did not complete this guide.

Miguel Soriano

Member since: 02/04/26

351 Reputation

2 Guides authored

Team

Texas Tech, Team 41-2, Johansen Spring 2026 Member of Texas Tech, Team 41-2, Johansen Spring 2026

TTU-JOHANSEN-S26S41G2

4 Members

70 Guides authored

0 Guide Comments

Add Comment

View Statistics:

Past 24 Hours: 1

Past 7 Days: 11

Past 30 Days: 47

All Time: 119