Introduction
If your laptop has trouble turning on, it may be due to poor battery life, failure to charge, and visible physical swelling. Over time, battery performance deteriorates as a result of repeated charge cycles, which can eventually cause the battery to lose its ability to hold a charge. If the battery is in your Asus Chromebook C204MA has died, it will need to be removed and replaced with a brand new battery for optimal performance.
Before replacing the battery, check the Asus Chromebook C204MA Won't Charge Troubleshooting Page
Warning: Swollen batteries are fire hazards and need to be handled with caution. Follow these safety guidelines when removing swollen or corroded batteries. What to do with a swollen battery - iFixit
Make sure to power off the laptop completely and disconnect the charging adapter before beginning the battery replacement or working with any internal components.
What you need
-
-
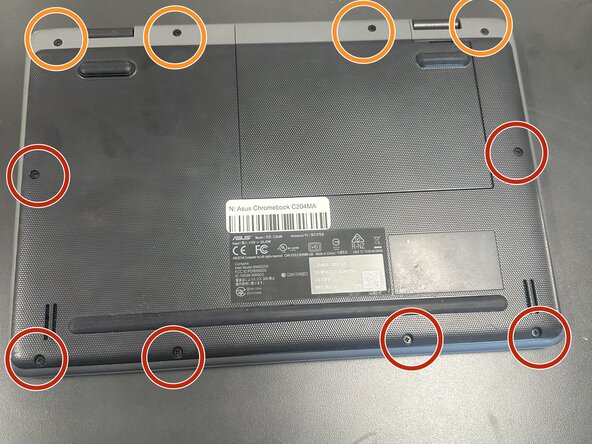
Close the lid and set the laptop with down the bottom facing up.
-
Use a Phillips #0 screwdriver to remove the following screws:
-
Six 6 mm-long
-
Four 8 mm-long
-
Lift and remove the panel.
 Ask FixBot
-
-
-
Lift the flap securing the keyboard ribbon cable and disconnect the ribbon cable.
-
-
-
Lift the locking flap securing the trackpad ribbon cable and disconnect the ribbon cable.
-
-
-
-
Lift up the silver hinge securing the battery connector and disconnect the battery connector.
-
-
-
Lift up the tape covering the display cable.
-
Lift the locking bar securing the display cable.
-
Disconnect the display cable.
-
-
-
Flip over the laptop and open the lid to a full 180 degrees.
-
Insert an opening pick into the seam between the palm rest assembly and chassis.
-
Slide the opening pick around the perimeter until the palm rest assembly fully releases.
-
Remove the palm rest assembly.
-
-
-
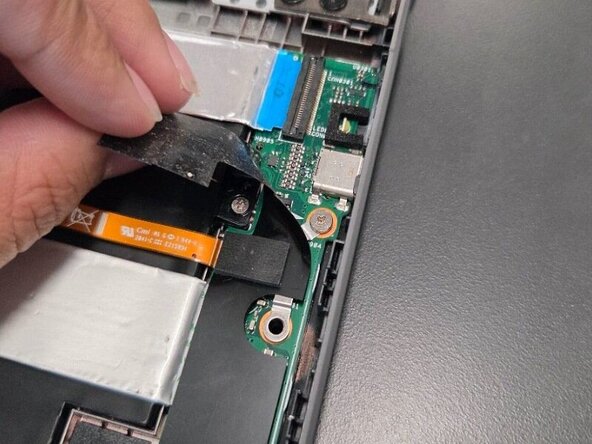
On the I/O board on the right half of the laptop, lift the black mylar film and unscrew the single 4 mm-long Phillips #0 screw.
-
Lift off the orange cable and black mylar film and set aside.
-
-
-
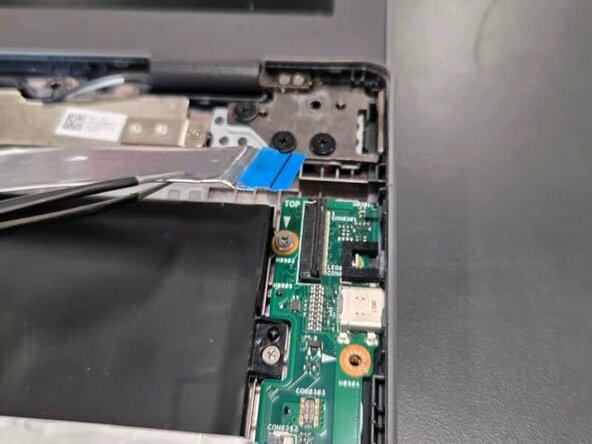
Lift up the locking flap securing the I/O board ribbon cable and disconnect the cable.
-
-
-
Lift up the locking flap securing the second I/O board ribbon cable and disconnect the ribbon cable.
-
-
-
In order to remove the motherboard to reach closer towards the battery, these are the steps required.
-
Remove the following screws with a Phillips screwdriver: two 5 mm-long black screws by the upper left of motherboard; one 4 mm-long sliver screw upper middle of the motherboard and one 4 mm-long sliver screw by the bottom left corner of motherboard.
-
-
-
Unscrew two 4 mm-long sliver screws at the sliver thermal support bracket, located at the bottom left and middle right.
-
-
-
Using your hands lift mother board slightly up and pull to the right slowly until motherboard is free.
-
-
-
Upon removal of motherboard, move motherboard and left side speaker out of the way.
-
Remove the three 4 mm-long sliver screws located on the right side of upper right portion of battery, bottom right portion of battery and far bottom left of battery (located next to speaker)
-
-
-
Lift black tape on the bottom right side of the battery.
-
Unravel black speaker cord across battery with tweezers.
-


To reassemble your device, follow the above steps in reverse order.
For optimal performance, after completing this guide, calibrate your newly installed battery.
Take your e-waste to an R2 or e-Stewards certified recycler.
Repair didn’t go as planned? Try some basic troubleshooting or ask our Answers community for help.
Team

Texas Tech, Team 45-67, Weston Fall 2025 Member of Texas Tech, Team 45-67, Weston Fall 2025
TTU-WESTON-F25S45G67
4 Members
5 Guides authored