5. Canbus

David Husolo and one other contributor
Last updated on Apr 15, 2023
Views: 1.5K
View statistics:
- Past 24 Hours:
- 1
- Past 7 Days:
- 10
- Past 30 Days:
- 71
- All Time:
- 1,480
Comments: 0
No one has left comments on this guide. Will you be first?
Go to guide commentsCompleted: 0 1
No one has marked this guide "completed." Will you be the first?
1 person has marked this guide "completed." It's you — great job!
Favorites: 1 2
1 person has favorited (and subscribed to) this guide. Will you be next?
2 people have favorited (and subscribed to) this guide — including you!
Community-Contributed Guide
An awesome member of our community made this guide. It was not created by iFixit staff.
Introduction
Go to step 1 ↓Do not connect 24v until told to do so. It's also wise to disconnect the hotend heater because some versions of the CAN board had the heater pins tied to the bootloader pin. It can cause the hotend to start heating uncontrollably.
-
-
-
Create the CAN0 interface file
-
sudo nano /etc/network/interfaces.d/can0
-
Enter the following
-
auto can0 iface can0 can static bitrate 500000 up ifconfig $IFACE txqueuelen 256 pre-up ip link set can0 type can bitrate 500000 pre-up ip link set can0 txqueuelen 256
-
Exit and save the file with CTRL + SHIFT X > Yes
-
Sudo Reboot
 Ask FixBot
-
-
-
The CAN board needs a bootloader so we can flash the Klipper firmware. We will use CanBoot. Download the CanBoot repository:
-
git clone https://github.com/Arksine/CanBoot
-
cd CanBoot
-
make clean
-
make menuconfig
-
-
-
Micro-controller Architecture > (STMicroelectronics STM32)
-
Processer model > STM32F072
-
Build CanBoot Deployment Application > (Do not build)
-
Bootloader offset > (8KiB bootloader)
-
Clock Reference > (8 MHz)
-
(500000) CAN bus speed
-
Communication interface > (CAN bus (on PB8/PB9))
-
-
-
Micro-controller Architecture > (STMicroelectronics STM32)
-
Processer model > STM32G0B1
-
Build CanBoot Deployment Application > (Do not build)
-
Clock Reference > (8 MHz)
-
Communication interface > (CAN bus (on PB0/PB1))
-
Application start offset > (8KiB offset)
-
(500000) CAN bus speed
-
-
-
Add the 5v jumper. Connect the USB-C from the Pi to the EBB36 board.
-
Put the EBB36 into DFU mode
-
Press and hold the RESET + BOOT button. Release the RESET button while holding the BOOT button, than release the BOOT button.
-
Get the device ID of the board after it's in DFU mode
-
Before DFU mode
-
In DFU mode
-
-
-
Erase and flash the firmware
-
sudo dfu-util -a 0 -D ~/CanBoot/out/canboot.bin --dfuse-address 0x08000000:force:mass-erase:leave -d DEVICE:ID
-
Power off the system. Plug in the 4 wire CAN cable from the UT0C to the EBB36, and power on the the printer and RPI.
-
After the system is powered up verify the CAN network is up.
-
cd klipper
-
python3 lib/canboot/flash_can.py -q
-
You should see 1 entry for application CanBoot. Note your UUID.
-
-
-
Run
-
cd ~/klipper
-
make menuconfig
-
Select the following
-
Enable extra low-level configuration
-
Micro-controller Architecture > (STMicroelectronics STM32)
-
Processer model > STM32F072
-
Bootloader offset > (8KiB bootloader)
-
-
-
-
continued:
-
Clock Reference > (8 MHz)
-
(500000) CAN bus speed
-
Save the configuration pressing ESC > Yes
-
Run
-
make clean
-
make
-
-
-
Micro-controller Architecture > (STMicroelectronics STM32)
-
Processer model > STM32G0B1
-
Bootloader offset > (8KiB bootloader)
-
Clock Reference > (8 MHz)
-
Communication interface > (CAN bus (on PB0/PB1))
-
(500000) CAN bus speed
-
-
-
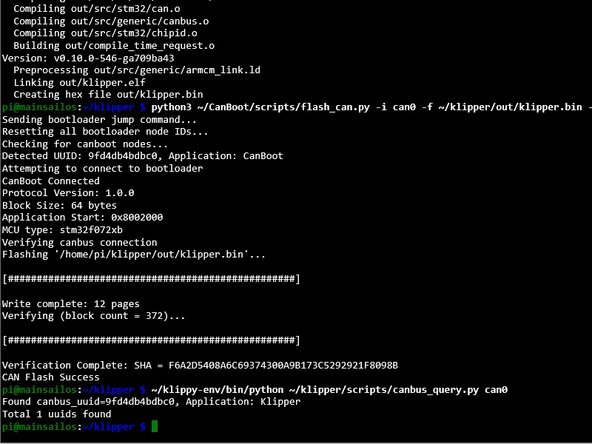
flash the EBB36 with the newly compiled firmware
-
python3 ~/CanBoot/scripts/flash_can.py -i can0 -f ~/klipper/out/klipper.bin -u 9fd4db4bdbc0
-
sudo dfu-util -a 0 -d 0483:df11 --dfuse-address 0x08000000 -D ~/CanBoot/out/canboot.bin
-
If all goes well your CAN board should now be flashed
-
run
-
~/klippy-env/bin/python ~/klipper/scripts/canbus_query.py can0
-
Load the provided files to the printer and press FIRMWARE_RESTART
-
Checking the Machine tab you should see the 4 systems
-
-