Introduction
The radiator fan resistor controls the speed of your engine cooling fan. When it fails, the fan may stop working at lower speeds or altogether, causing your engine to overheat — especially in stop-and-go traffic. This guide will show you how to replace the radiator fan resistor on a Dodge Grand Caravan (and similar models such as the Journey, Ram 1500, Dakota, and Durango) with the resistor mounted on the engine bay fan shroud.
Safety Warning: Let the engine cool for at least 30 minutes after driving before beginning this repair. Engine bay components will be extremely hot.
Note: A failed resistor may show no visible signs of damage (no burn marks). Trust the symptoms — fan not spinning at all speeds, or engine overheating — rather than what you can see.
What you need
-
-
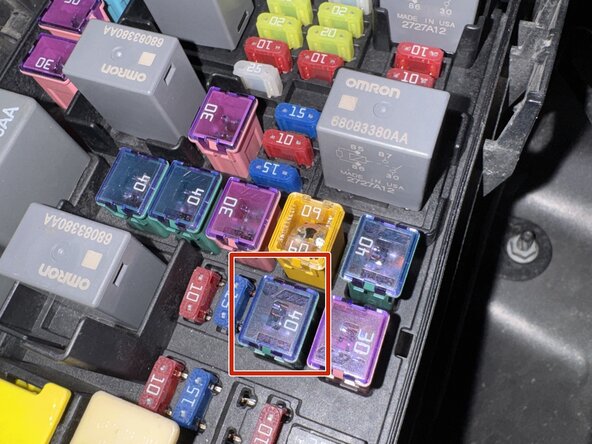
Check for symptoms: fan not spinning at all speeds, engine overheating (especially in traffic). Open the under-hood fuse box (near the battery). Find the cooling fan fuse using the lid diagram or owner's manual.
-
Red: Cooling Fan Fuse
 Ask FixBot
-
-
-
Park the vehicle on a flat surface and apply the parking brake. Turn the engine off and open the hood.
-
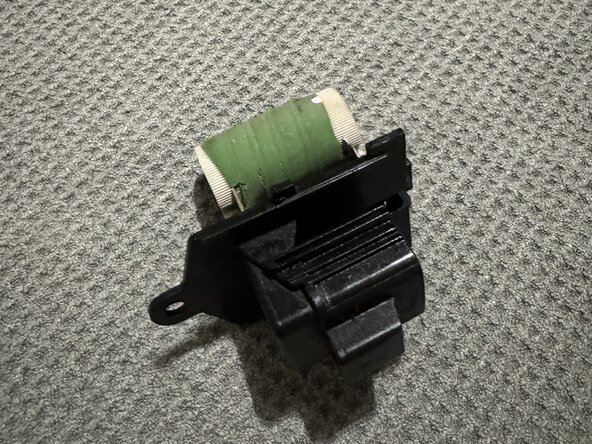
Gather your tools: 8mm socket and ratchet set with extension, 10mm wrench, work gloves, and the new replacement radiator fan resistor (matched to your vehicle year and model).
-
Pink: Radiator Fan Resistor
-
Blue: Ratchet Extension
-
Red: 10mm Wrench
-
Orange: 8mm Socket
-
Yellow: Work Gloves
-
-
-
Using a 10mm wrench, loosen and remove the negative (-) terminal bolt from the battery. Lift the negative cable away from the terminal and tuck it to the side so it cannot accidentally touch the terminal during the repair.
-
Red: Negative Battery Terminal Bolt
-
-
-
-
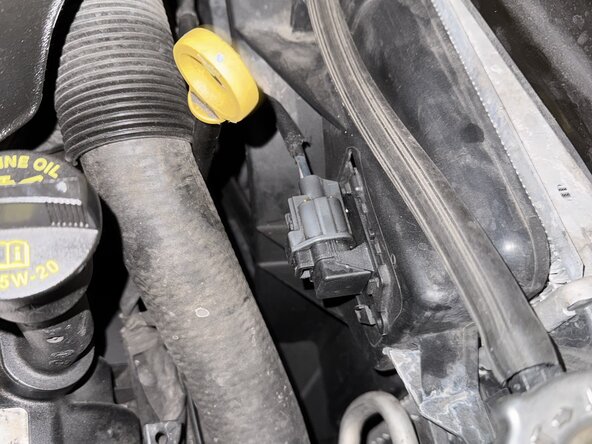
Look into the engine bay and locate the radiator fan assembly. The radiator fan resistor is mounted on the LEFT side of the fan shroud (the black plastic housing surrounding the fan). It is a small rectangular component with two screws and a wiring harness connector attached.
-
Pink: Radiator Fan Resistor Location
-
Red: Engine
-
Blue: Battery
-
Green: Radiator
-
-
-
Locate the wiring harness connector on the resistor. Press down on the locking tab (the small plastic tab on the side of the connector) with your thumb while gripping the connector body firmly. Pull straight out — do not pull by the wires. The connector should release smoothly.
-
Blue: Wiring Harness Connector
-
-
-
Using your 8mm socket and ratchet with extension, remove the two mounting screws holding the resistor to the fan shroud. Tip: If the screws are rusted, apply a small amount of penetrating oil (WD-40 or PB Blaster) and wait 10 minutes before removal to avoid stripping.
-
Blue: Mounting Clip
-
Yellow: Radiator Fan Resistor
-
Pink: Engine
-
-
-
Align the new resistor with the opening in the fan shroud and slide it straight in. Do not angle or force it. Once flush against the housing, thread the two 8mm screws in by hand, then tighten snug with the socket (approx. 20 in-lbs).
-
-
-
Press the wiring harness connector firmly onto the new resistor. Push straight in until you hear or feel the locking tab click into place. Give the connector a gentle tug to confirm it is fully seated and locked. A loose connector is a common cause of failure after installation.
-
-
-
Reattach the negative (-) battery cable to the battery terminal and tighten the bolt with your 10mm wrench. Close the hood, then start the engine and allow it to warm up to normal operating temperature.
-
Red: Negative Terminal
-


After completing the repair, start the engine and let it warm up to normal operating temperature. Watch the radiator fan — it should spin up automatically as the engine heats up, with the fan running at varying speeds depending on temperature. The dashboard temperature gauge should stay in the normal range. If the fan still does not operate correctly, use the diagnostic flow chart below:
Fan works → Success!
Fan does not work → Check that the connector is fully seated
Fan still does not work → Check the cooling fan fuse
Fan still does not work → The fan motor itself may need replacement
Congratulations! You have successfully replaced your radiator fan resistor.

Team

York University, Team M-3, Woodhouse Winter 2026 Member of York University, Team M-3, Woodhouse Winter 2026
YORK-WOODHOUSE-W26SMG3
7 Members
3 Guides authored