Introduction
This guide provides step-by-step instructions for replacing the driver-side taillight assembly on a 2010 Toyota Tacoma.
The guide also explains how to remove and transfer the bulbs if your replacement taillight assembly does not include them. Before starting, check whether your replacement part comes with bulbs. If the bulbs have never been replaced, this is a good opportunity to install new ones, as they may be near the end of their lifespan and replacing them now can save time later.
Be sure to read through the notes and warnings before beginning the repair. Gloves are optional but may be helpful.
To reduce waste and support iFixit’s repair mission, consider sourcing a replacement taillight assembly from a junkyard. Junkyards often have vehicles with usable parts that can be removed and reinstalled. While this option may take additional time, it can reduce waste and save money.
What you need
-
-
Open the tailgate by lifting on the handle and lowering the tailgate to expose the bolts.
-
Locate the two taillight assembly bolts at the top and bottom.
-
-
-
-
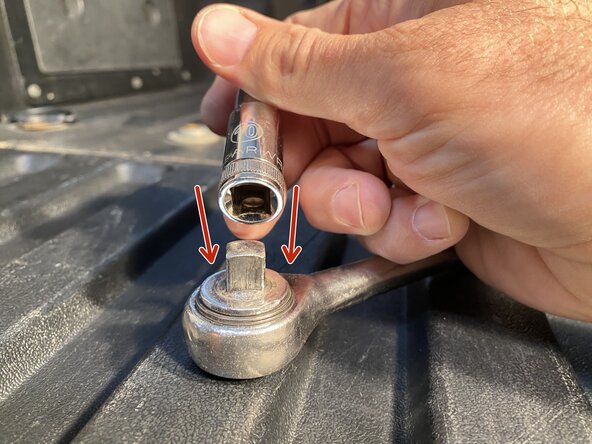
Place your socket wrench with 10mm socket attached (or box end wrench) on the lower assembly bolt.
-
Loosen and remove the lower assembly bolt. To loosen, turn the wrench and bolt counter-clockwise.
-
Once the bolt is free, place it somewhere it will not get lost.
-
After removing the lower bolt, loosen and remove the upper assembly bolt in the same manner you removed the lower bolt. Once removed, place the bolt with the lower assembly bolt.
-
-
-
Locate the wiring harness so you can disconnect the existing taillight assembly.
-
To disconnect the wiring harness from the existing assembly you will need to press on the tab shown in the photo.
-
While pressing on the tab, pull the two connectors away from each other.
-
If you do not need to replace the bulbs, follow these steps in reverse to install the replacement taillight assembly.
-
-
-
Once the bulb from the old assembly has been removed from the housing, with one hand, grasp the bulb at the bulb mount (the black portion immediately below the bulb) above where it inserts into the wire/bulb connector housing (light gray part). With the other hand, grasp the wire/bulb connector housing.
-
After grasping by the black bulb mount, firmly pull the bulb away from the wiring connector.
-
To remove the backup light bulb, repeat Steps 7 and 8.
-


- To install the replacement taillight assembly, follow these instructions in reverse.
- Note: After connecting the wiring and bulbs, test them before you reinstall the taillight assembly. This way, you will not have to go through all the steps to remove the taillight again if something does not work.

Team

CSU Sacramento, Team 1-18, Laflen Fall 2025 Member of CSU Sacramento, Team 1-18, Laflen Fall 2025
CSUSAC-LAFLEN-F25S1G18
1 Member
1 Guide authored